
WordPress plugin updates enable you to maintain peak performance while keeping your site secure. However, you may not know how to manage updates on your site.
Luckily, there are lots of ways to run WordPress plugin updates, and most of them are fairly straightforward. For example, you can update plugins in bulk, use a staging site, and enable automatic updates.
Why it’s important to update your WordPress plugins
Plugins are a great way to extend the functionality of your site. However, they need to be updated regularly if you want to maintain a good user experience and keep your site secure.
Outdated software can act as a backdoor to your site for people with malicious intent. Often, vulnerabilities in software become known to hackers, who are then able to find ways to exploit plugins and gain access to your site and its database.
Plugin updates usually come with patches for these known vulnerabilities and can therefore increase the security of your site. They may also contain corrections for other errors.
Plus, most developers release updates with improved code to help make your site lighter and faster. These updates may also include new features that add more functionality to your site.
How to Manage WordPress Plugin Updates
Now that you know why updating WordPress plugins is important, let’s take a look at six tips to help you get started. First, though, let’s go through the default way of updating plugins in your WordPress dashboard.
all you have to do is raise your head dashboard, Update,
Here, you can see which version of WordPress you are running on your site. Also, you will be able to see if there is any update available.
If you scroll down, you’ll also see if you have any themes or plugins that need updating. You can select the ones you want to update and click update plugins,
WordPress will let you know when updates are available Update tab. Often, you’ll also see a notification on plug-in tab.
Now, let’s look at
six effective ways to manage WordPress updates on your site.
- Update plugins in bulk
- View version details before updating plugins
- Use a Staging Site to Test WordPress Plugin Updates
- Roll back the plugin to the previous version
- Enable automatic updates for trusted plugins
- Install the Backup Recovery Plugin
1. Update Plugins in Bulk
If you have more than one plugin that needs updating, you might want to look for and update plugins in bulk. This enables you to complete your WordPress plugin updates at a very high speed.
To get started, go to plug-in, installed plugins, Then click on update available,
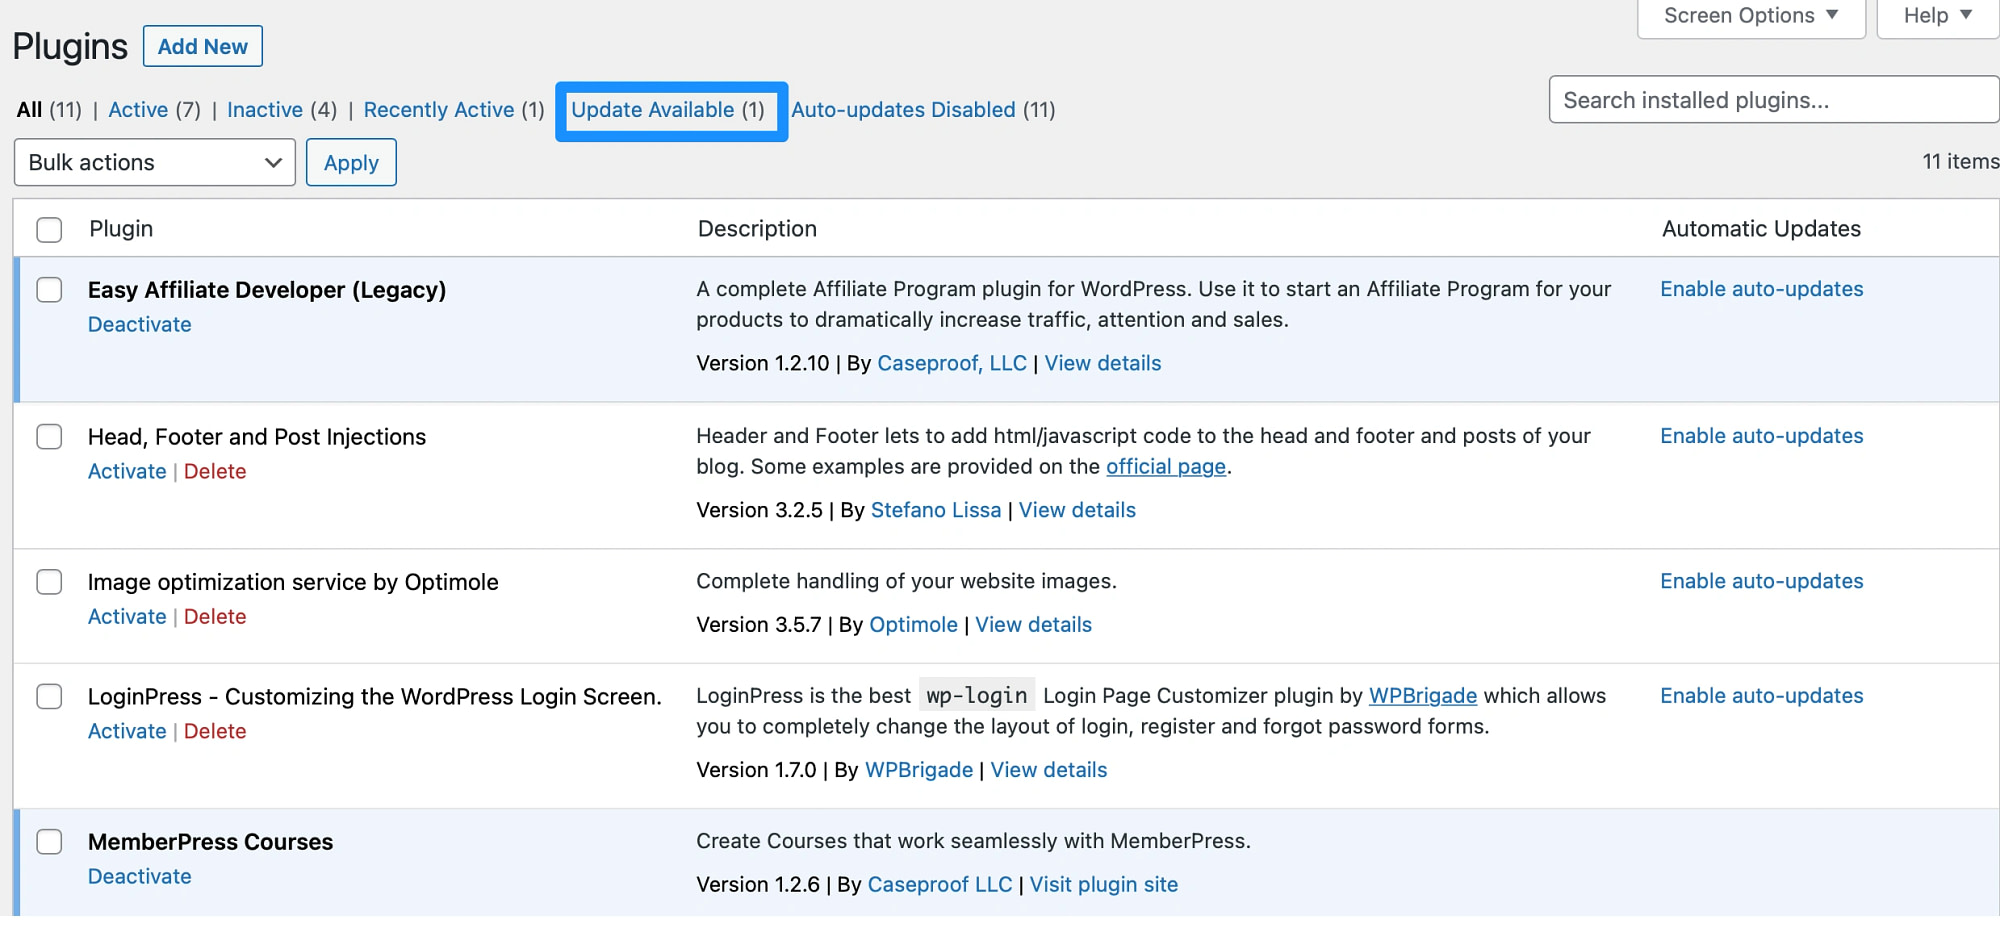
Here, you can see all the plugins that need to be updated. You can either select the specific plugins you want to update or tick the Placement box at the top of the list to select them all.
Next, use the bulk action dropdown menu to select Updates,
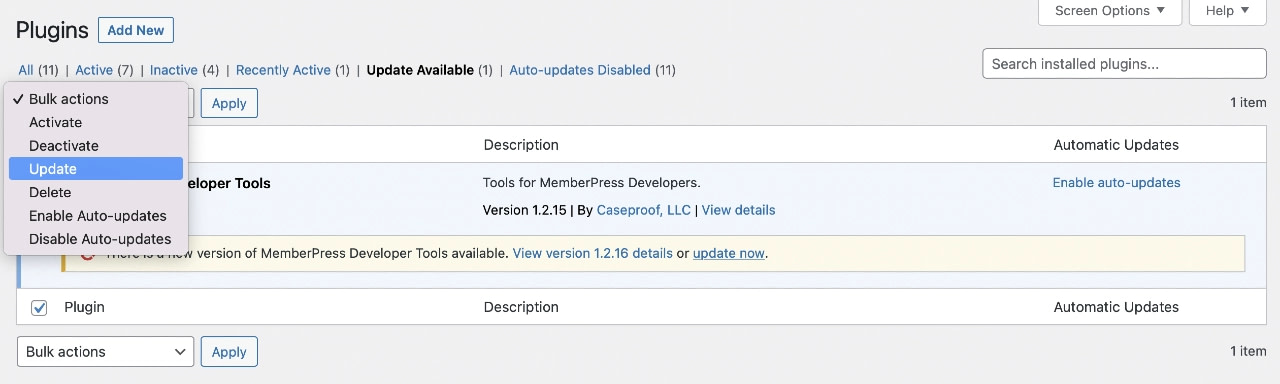
Then click on Apply To complete your WordPress plugin update.
While this method can be quite efficient, you’ll want to avoid updating too many plugins at once, as this can take a toll on your site.
2. Check Version Details Before Updating Plugins
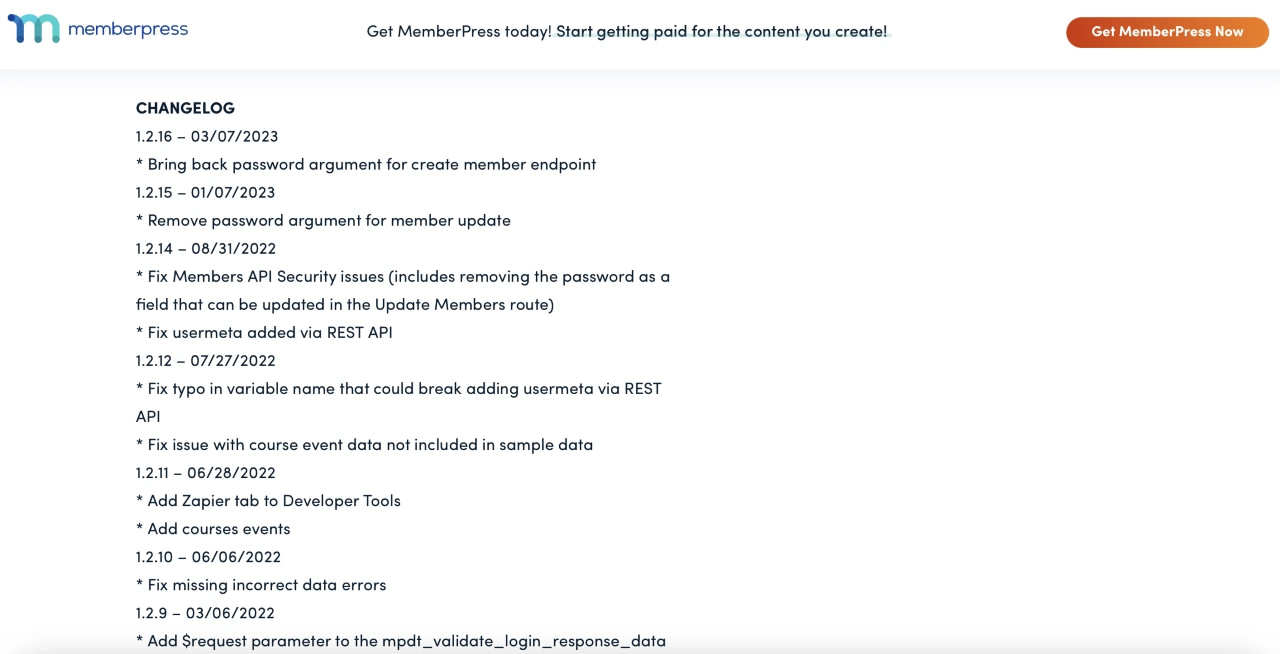
To make sure all updates are safe and compatible with your site, you’ll want to click the View version description Before you run the update. This way, you can see all the changes the developer has made to the plugin.
Sometimes, you’ll be redirected to a web page that logs every change made to that plugin:
As a general rule, if an available update focuses on adding new features, you’ll need to wait at least a week before running it. By that time, any compatibility issues or errors should have been identified and resolved by the developers.
Of course, if it’s a security or maintenance update, you’ll want to go ahead and update the plugin right away.
3. Use a Staging Site to Test WordPress Plugin Updates
Another way to effectively manage WordPress plugin updates is to use a staging site. This way, you can test the update before implementing the changes on your live website.
A staging site is a copy of your website that can be used to test new features, run updates, or change themes. Since your staging site is not accessible to the public, you are able to apply these changes privately without affecting the user experience. Plus, your live website will be unaffected if anything goes wrong.
Most quality WordPress hosting providers offer staging sites with their hosting plans. Otherwise, the easiest way to create a staging site is to use a plugin like WP Staging:
With WP Staging, you will also be able to clone your entire database. Plus, it’s easy to push changes and migrate plugins to your live site once you’ve confirmed it’s safe to do so.
4. Roll back the plugin to a previous version
In some cases, WordPress plugin updates can break your site. For example, there could be a bug in the code or the update could conflict with another plugin or theme on your site. In this case, you can roll back the software to reverse the change.
If the update broke your site, and you can’t access your dashboard, you’ll need to deactivate the plugin first. To do this, you’ll need to have access to your site files through the cPanel in your hosting account. Alternatively, you can connect to your site through a File Transfer Protocol (FTP) client.
Next, locate the root directory of your site. it is usually labeled public_html,
then, open the wp-content folder and click on the plug-in,
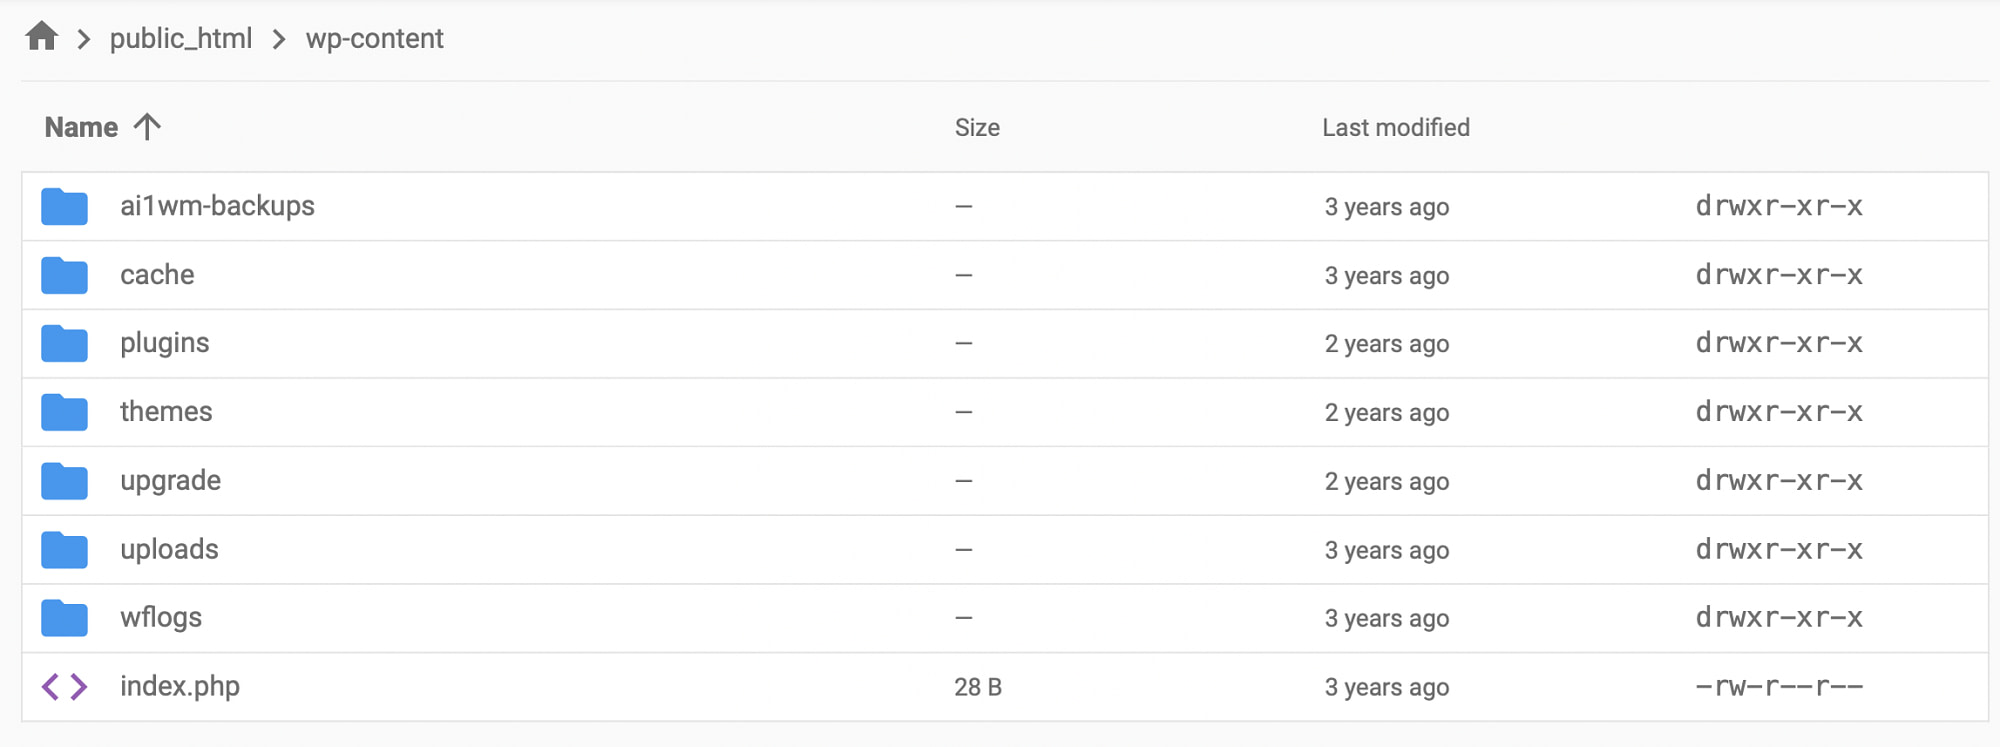
Here, find the plugin that caused your site to break and rename the folder to “plugin name-old”. This will automatically deactivate the plugin, and you will now be able to access your site’s dashboard again.
To go back to a previous version of a plugin, you can use a tool like WP Rollback:
Once you have installed the plugin, navigate to your plug-in page in WordPress. now, you should see a rollback Link at the bottom of each plugin:
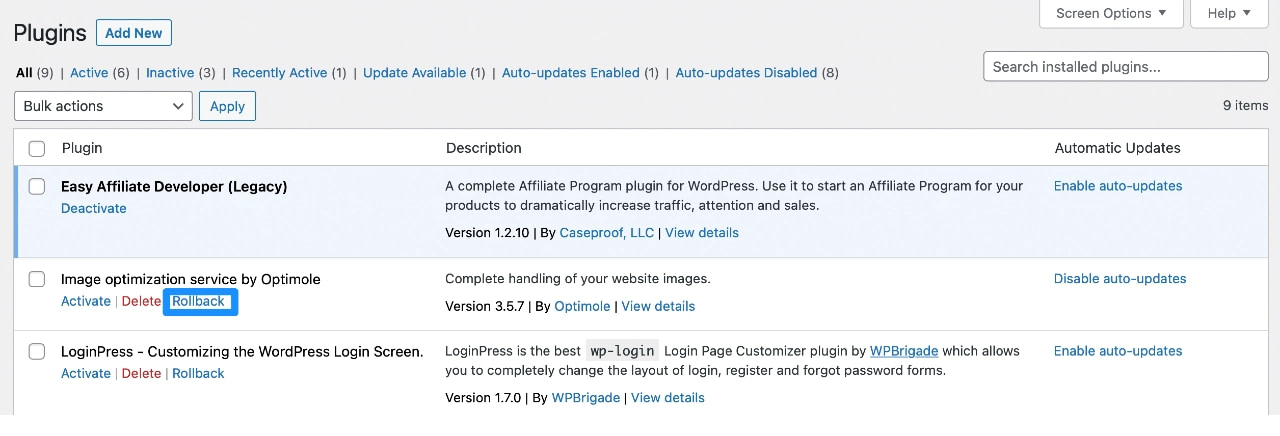
Clicking on this link will take you to a page where you can roll back the plugin to the previous version. All you have to do is choose your preferred version and click rollback,
5. Enable Automatic Updates for Trusted Plugins
The more plugins you have on your site, the more updates you’ll need to make. This task can be quite onerous, and you have to remember to check your site for updates every day. That’s why you may want to enable automatic plugin updates in WordPress.
It’s important to note that automatic updates have both advantages and disadvantages, so we recommend only enabling automatic updates for plugins from developers you trust.
If you want to enable automatic WordPress plugin updates, here’s how to do it…
go to plug-in, installed plugins, Next to each plugin, you should see a enable auto-update Option:
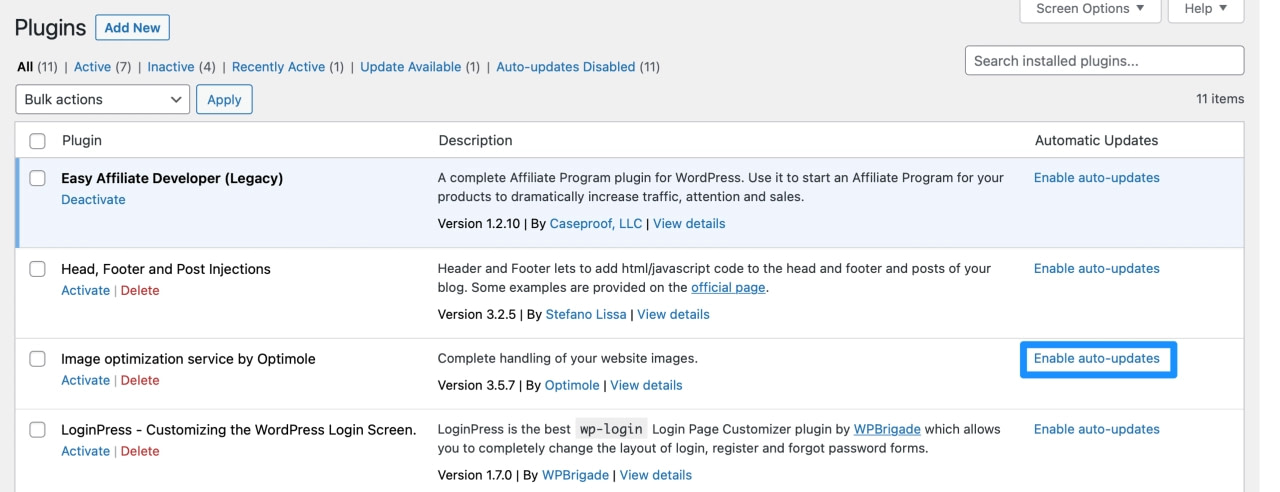
Once you select it, the setting should take effect immediately. WordPress will check for updates twice per day and automatically apply any available updates.
However, if you ever change your mind, just select disable auto-update to reverse the change.
If you’re worried about automatic plugin updates breaking your site, you might want to choose a WordPress host with regression testing for plugin updates.
These hosts will automatically compare visual screenshots of your site before and after the update to spot problems. If the host detects a problem, it can automatically roll back those changes to make sure your site keeps working.
Popular hosts that provide this type of functionality include the following:
6. Install the Backup Recovery Plugin
When managing WordPress plugin updates, it’s a good idea to install a backup plugin if your host doesn’t already provide functional backup and restore tools.
That way, if something goes wrong, you’ll be able to restore your website to a previous version.
This is especially important if you’re running updates on a live site. If you get bad updates, your website may crash, and you may lose traffic and revenue.
So, when you use a backup plugin like UpdraftPlus, you can run updates with peace of mind:
With this tool, you can create fresh backups and restore your sites in just a few clicks. It enables you to back up WordPress files, database tables, plugins, and themes and store them in any location of your choice. Better yet, you can automate the process by scheduling hourly, daily, or weekly backups.
Work More Effectively With WordPress Plugin Updates
WordPress plugin updates are an important part of keeping your website safe and secure. They also enable you to access new features and maintain a seamless user experience. Luckily, there are lots of ways to update plugins quickly and safely.
To recap, here are six tips for managing WordPress plugin updates:
- Update plugins in bulk to save time.
- Check the version details to make sure the plugin is compatible with your site.
- Use a staging site to safely update plugins.
- Roll back the plugin to a previous version to remove any unwanted changes.
- Enable automatic updates for trusted plugins to streamline your workflow.
- Install a backup recovery plugin like UpdraftPlus,
To learn about WordPress core updates in general, you might also be interested in our posts on How to Update WordPress Safely and How to Manage Automatic Updates for WordPress Core.