One of the easiest ways to improve the user experience (UX) on your site is by using WordPress personalized content. However, this process can become time consuming if you don’t automate it.
Luckily, you can easily create personalized content with the help of some useful plugins. This way, you can present different web pages, products, or prices based on each user’s behavior.
Benefits of Content Personalization
Content personalization enables you to tailor content such as web pages, product lists and articles to the individual preferences of each of your visitors. With the right tools, you can present content that is more relevant to your users while creating a unique UX.
For example, if you run an e-commerce store, you can show customers related products based on their recent activity on your site. For blogs, you can recommend similar articles that may be of interest:

Some websites may also use targeted advertisements on their pages. By displaying more interesting ads to your users, you can make your ad-heavy interface more user-friendly.
When you’re able to make relevant content more visible, you provide more value to users. As a result, you can lower your bounce rate and increase time on site. Both of these factors can affect your search ranking as well.
Additionally, using content personalization is an easy way to gain deeper insights into your customers’ behaviors. For example, you can track the time people spend on each page and identify which types of content get the most engagement. Then, you can optimize your website to improve conversions and sales.
Three Best WordPress Content Personalization Plugins
Now that you know a little more about content personalization, let’s take a look at three of the best solutions to add to your WordPress website.
- If-then dynamic content personalization
- otter blocks
- Product Addons and Fields for WooCommerce (PPOM)
1. If-then Dynamic Content Personalization
The If-So Dynamic Content Personalization plugin allows you to offer bespoke content on your site. You can personalize almost every element, including titles, images, and even menus. What’s more, there are tons of personalization options including geographic location, device type, date, search term, and more.
Search terms is a particularly helpful feature, as it enables you to show visitors the exact content they were searching for on Google.
Additionally, you can change your content based on how many times a user has accessed your site. This means that first-time visitors get a different experience than returning customers.
To get started, you need to install and activate the plugin in your WordPress dashboard. then, navigate If this is the case Select More in your sidebar add new trigger,
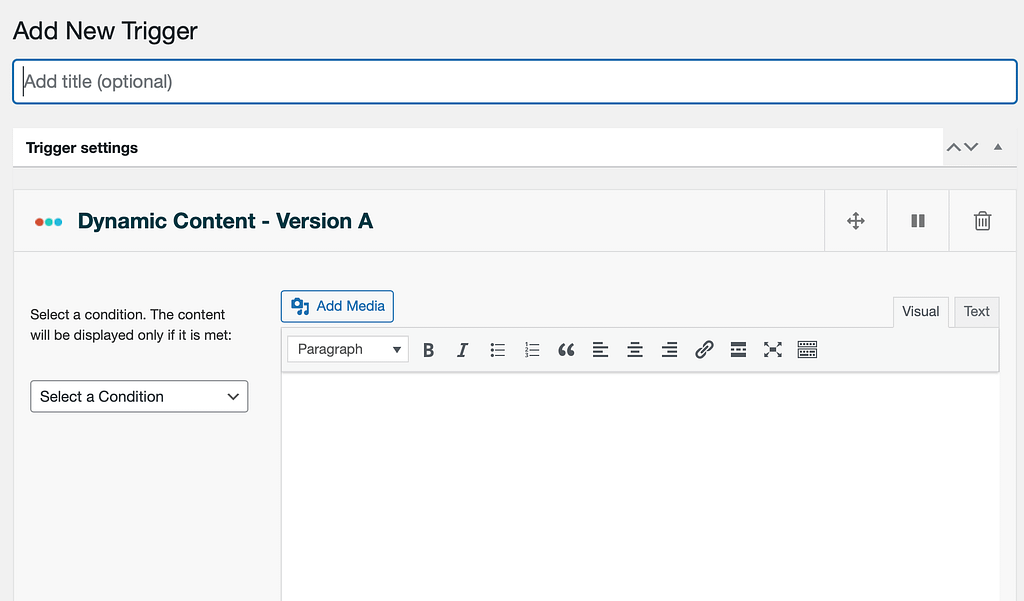
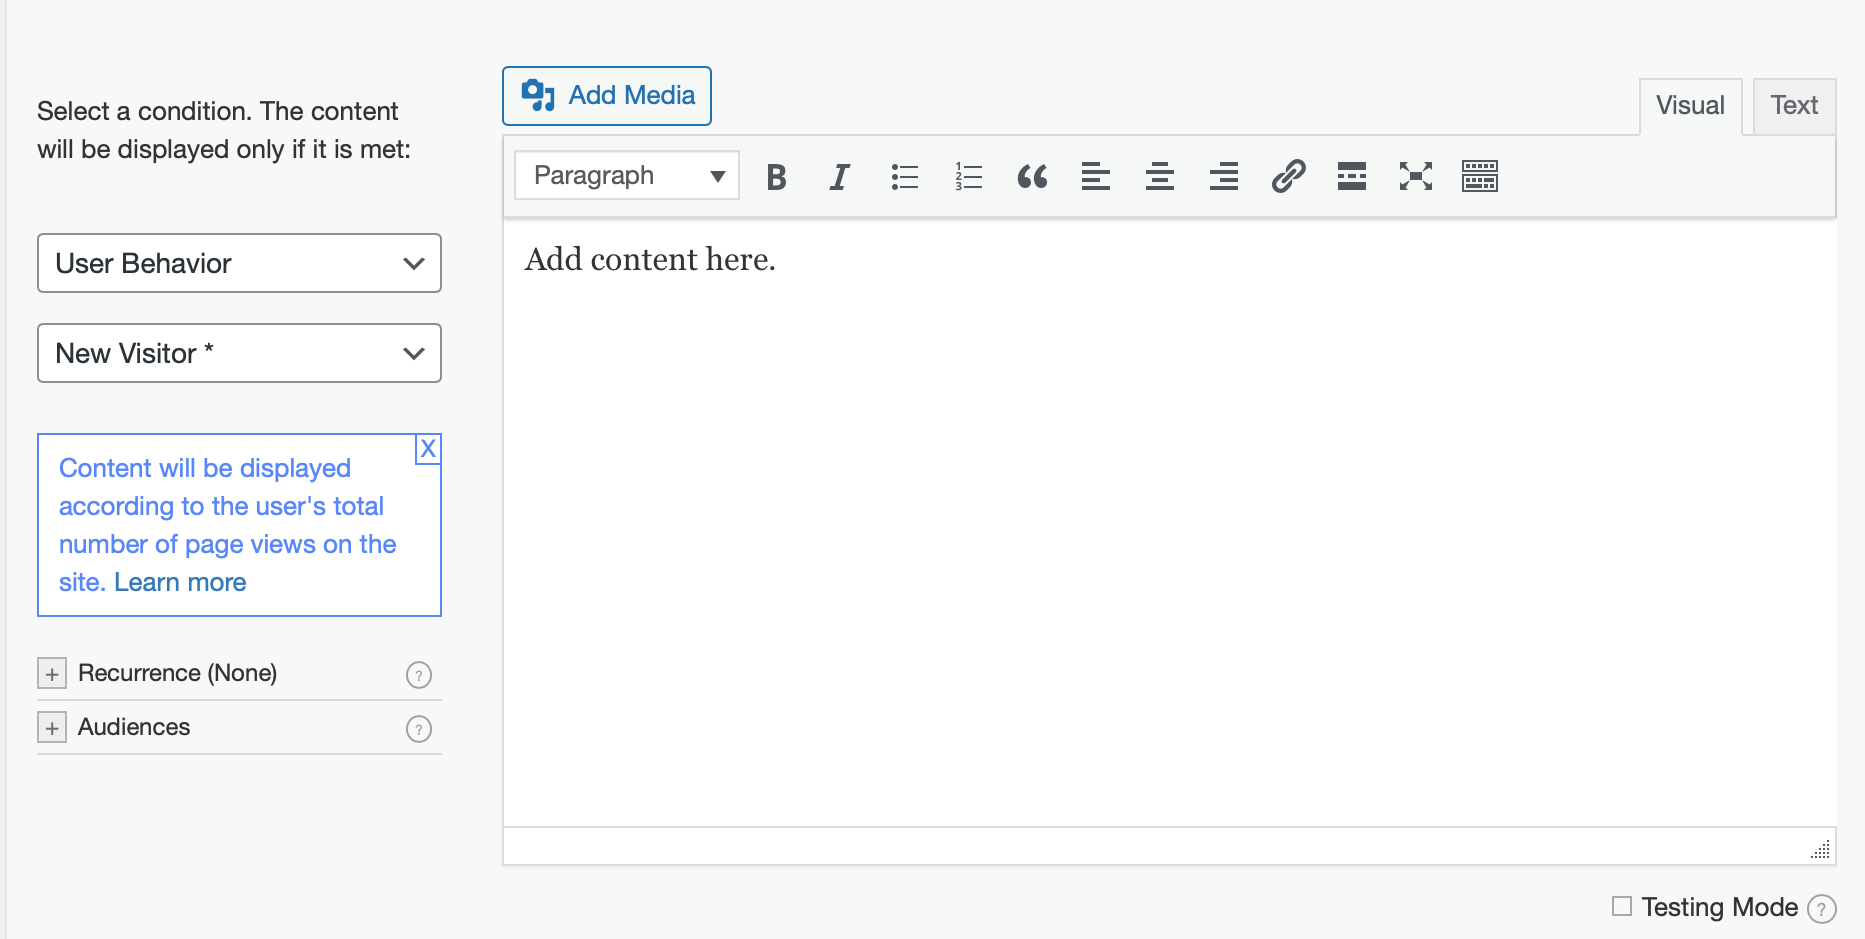
Here, you can choose a condition on the left and set the content to display on the right. For example, we clicked user behavior and then chose new visitor, This allows you to customize content based on the total number of page views a user has on your site:
You can also create if-then conditions directly in your posts and pages.
Go to the post or page where you want to add WordPress personalized content and navigate to block Adjustment. then, expand dynamic content Tab:
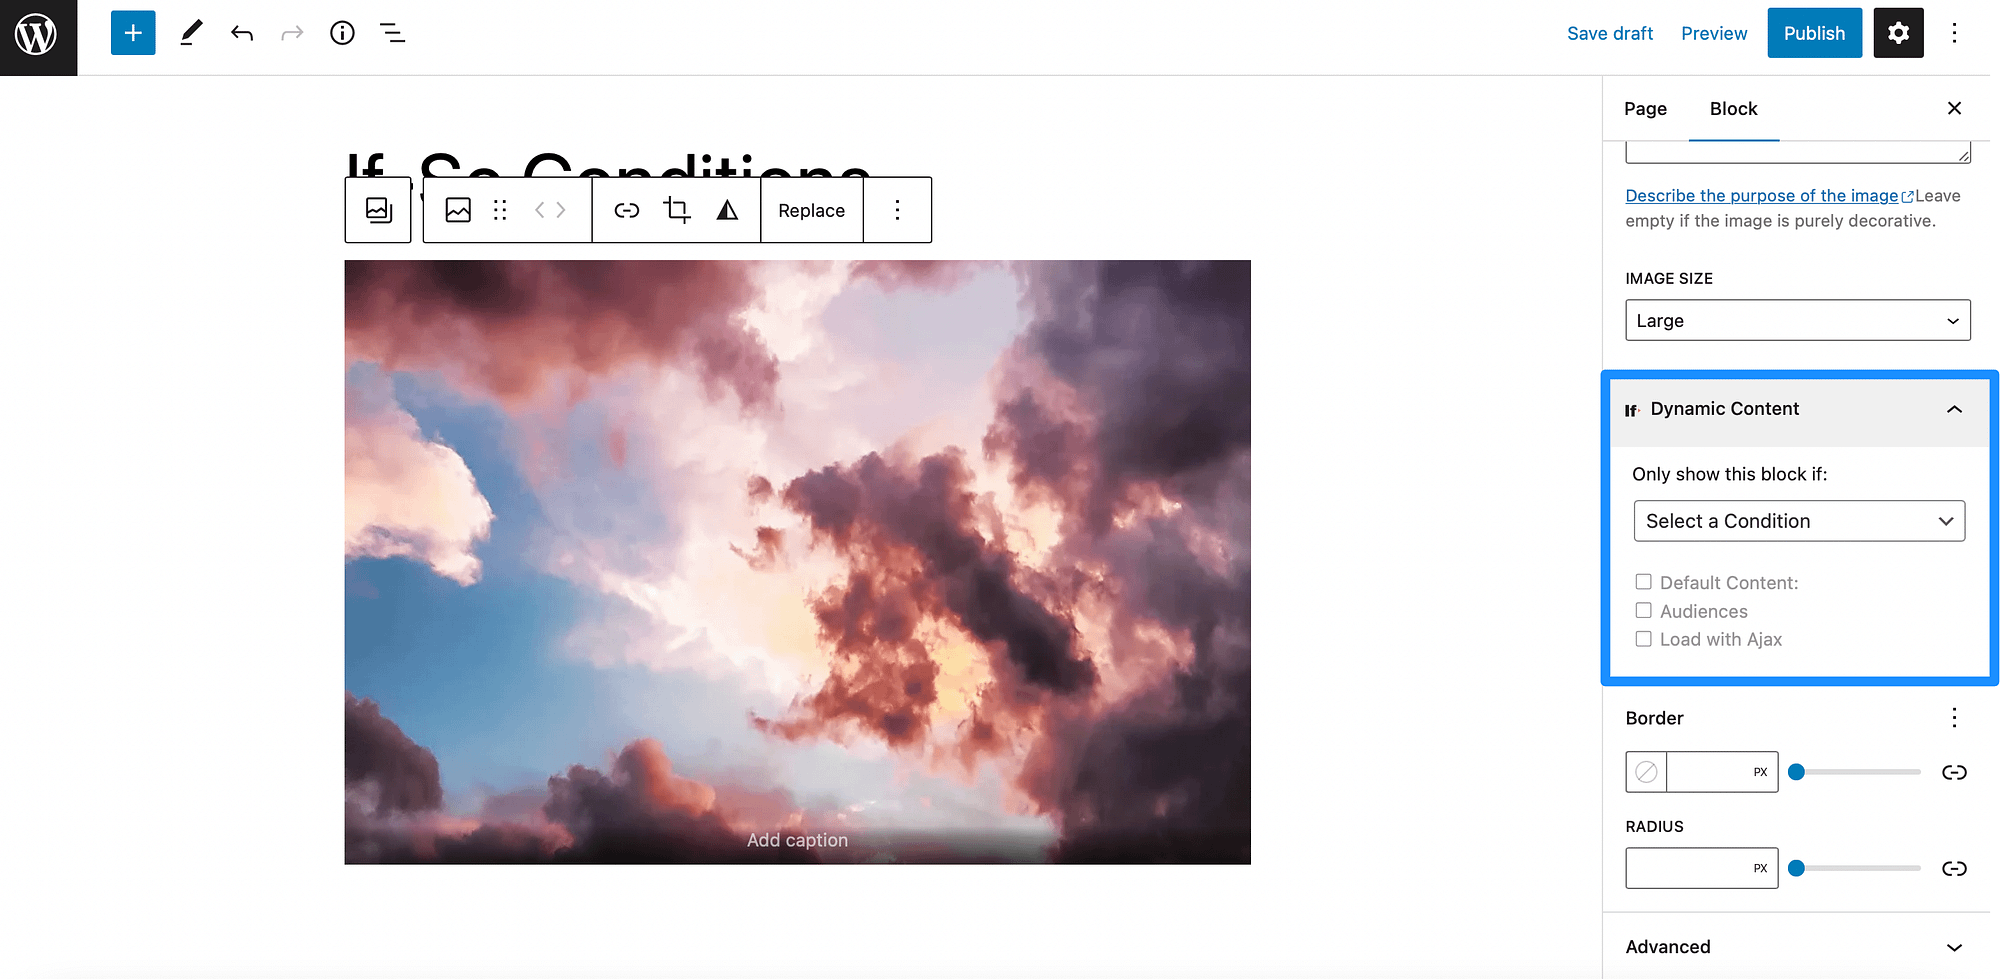
Now click on select a condition and add your criteria:

For example, we’ve configured our image block so that it’s only visible to users on mobile devices. Its as simple as that!
Price determination:If So has both free and paid versions. premium plans Start at $89 per year.
2. Otter Block
Otter Blocks extends the functionality of the block editor to create a better page-building experience. Not only do you get access to additional blocks, but you can also take advantage of custom CSS, animations, and, best of all, visibility conditions.
Visibility Criteria enables you to create WordPress personalized content based on rules. These rules or ‘conditions’ must be met before the particular block is displayed on your page. For example, you might prefer to show only certain parts of the content to logged-in users or users with certain user roles.
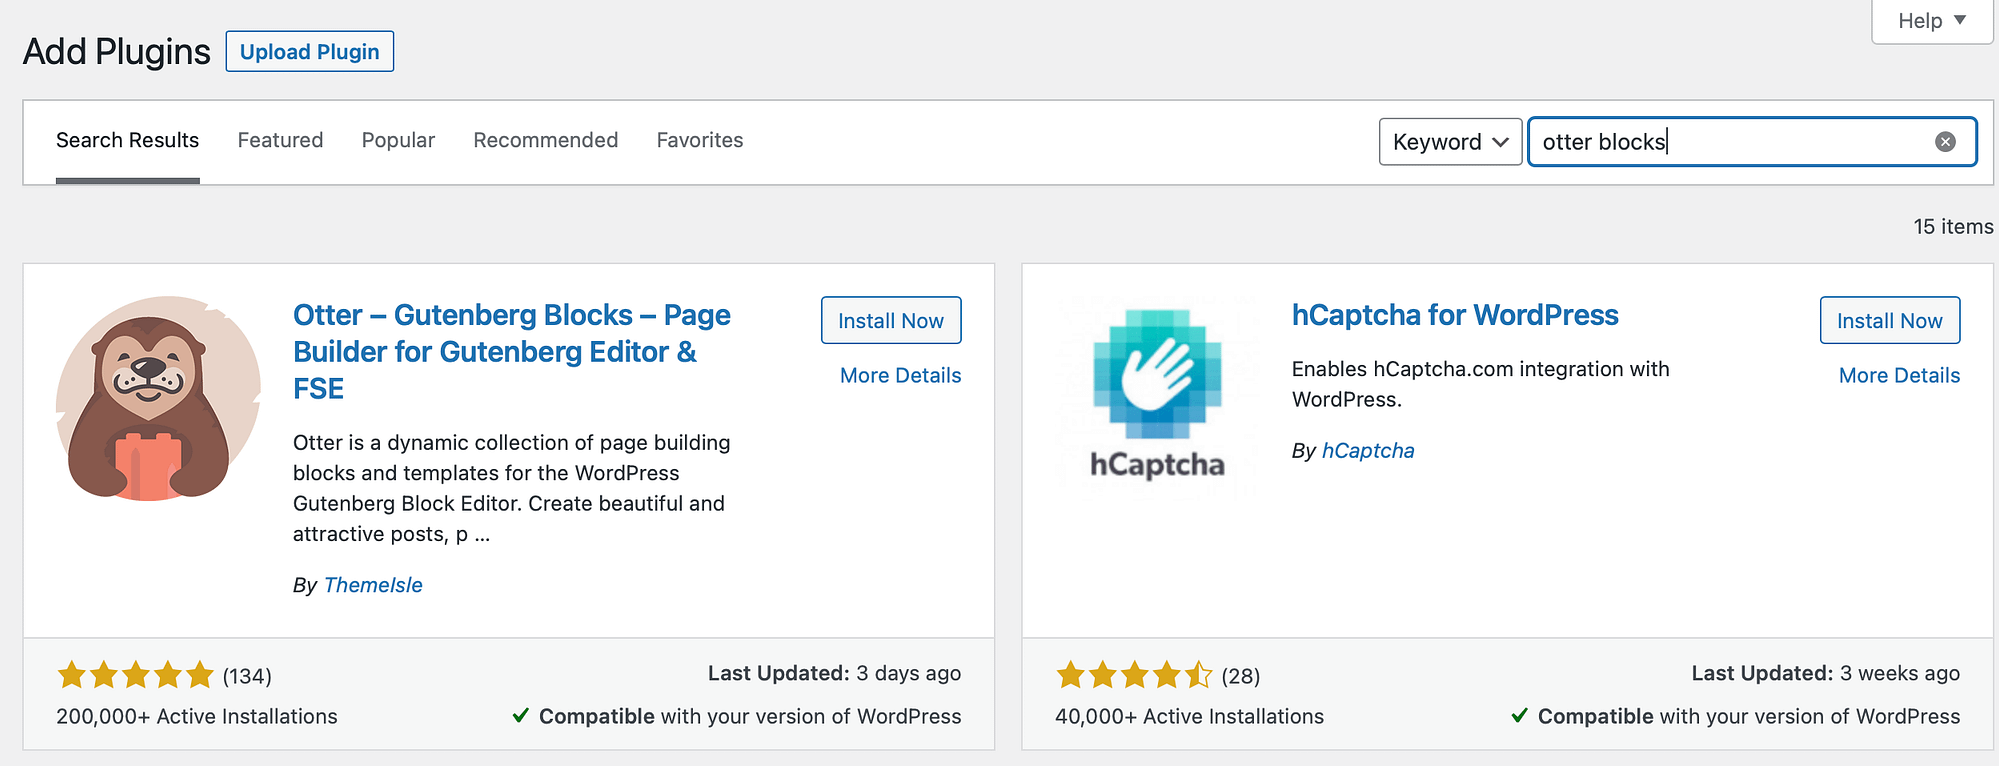
To start, you’ll need to search for “Otter Blocks”. plug-in Menu. Alternatively, you can opt for Otter Blocks Pro to access more blocks and advanced settings.
Whether you search for a plugin or upload a premium zip file, you will need to install and activate it in your WordPress dashboard:
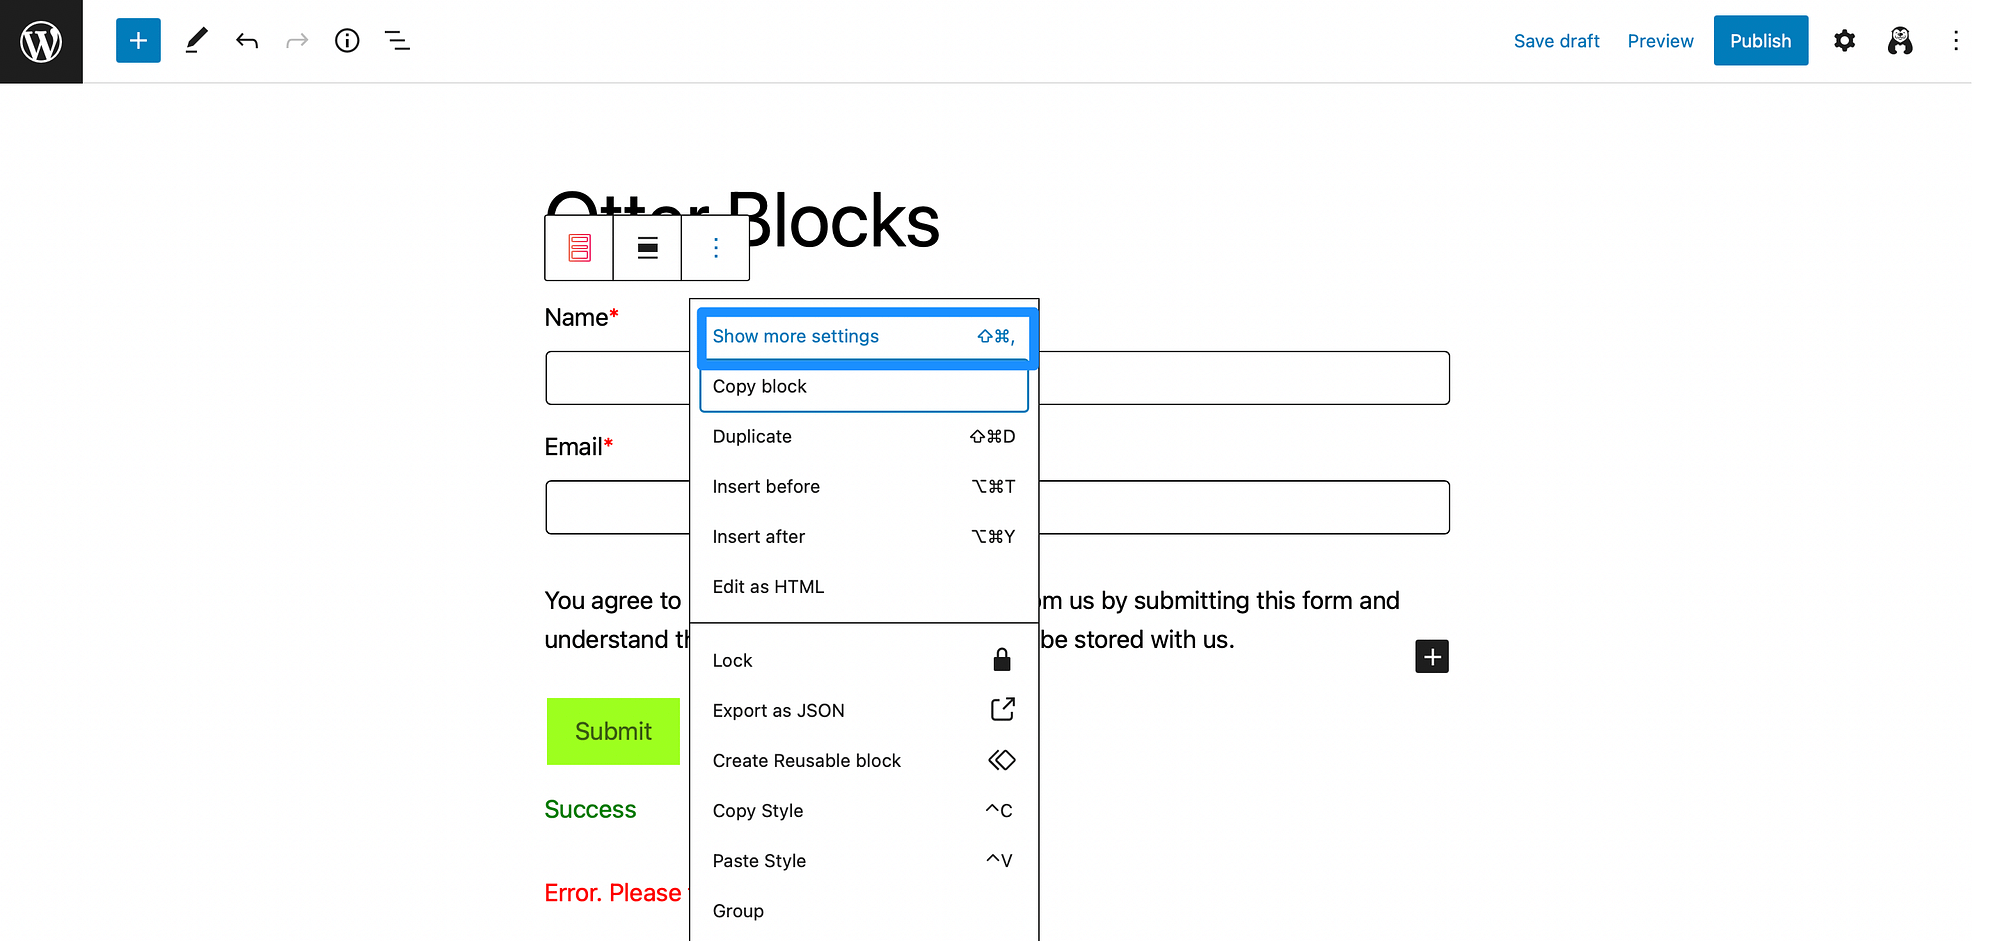
Now, go to the page or post where you want to add WordPress personalized content. Add a block to your page as a button, gallery, or form. Then, select the block, click on the three dots in the toolbar and choose show more settings,
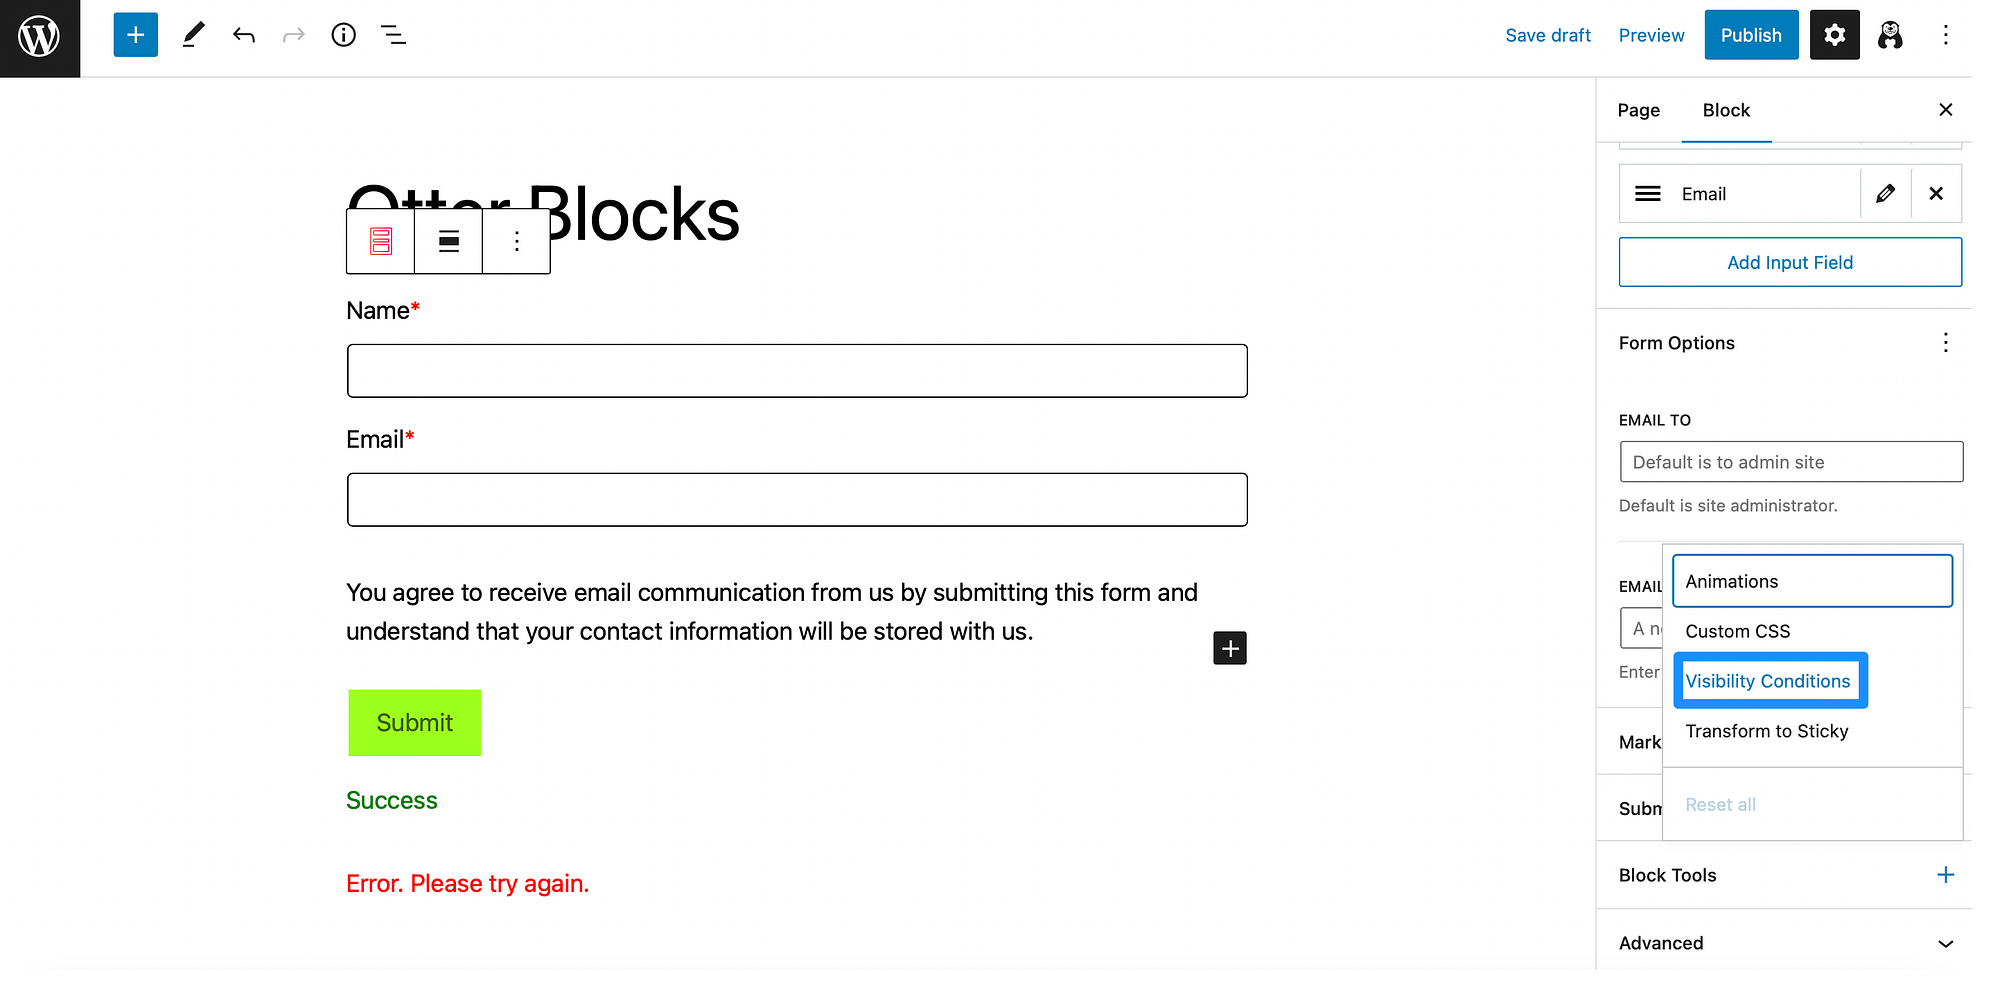
Now, you’ll be able to access Outer Blocks block Settings on the right side of your screen. To enable visibility conditions, click block tools and choose visibility conditions,
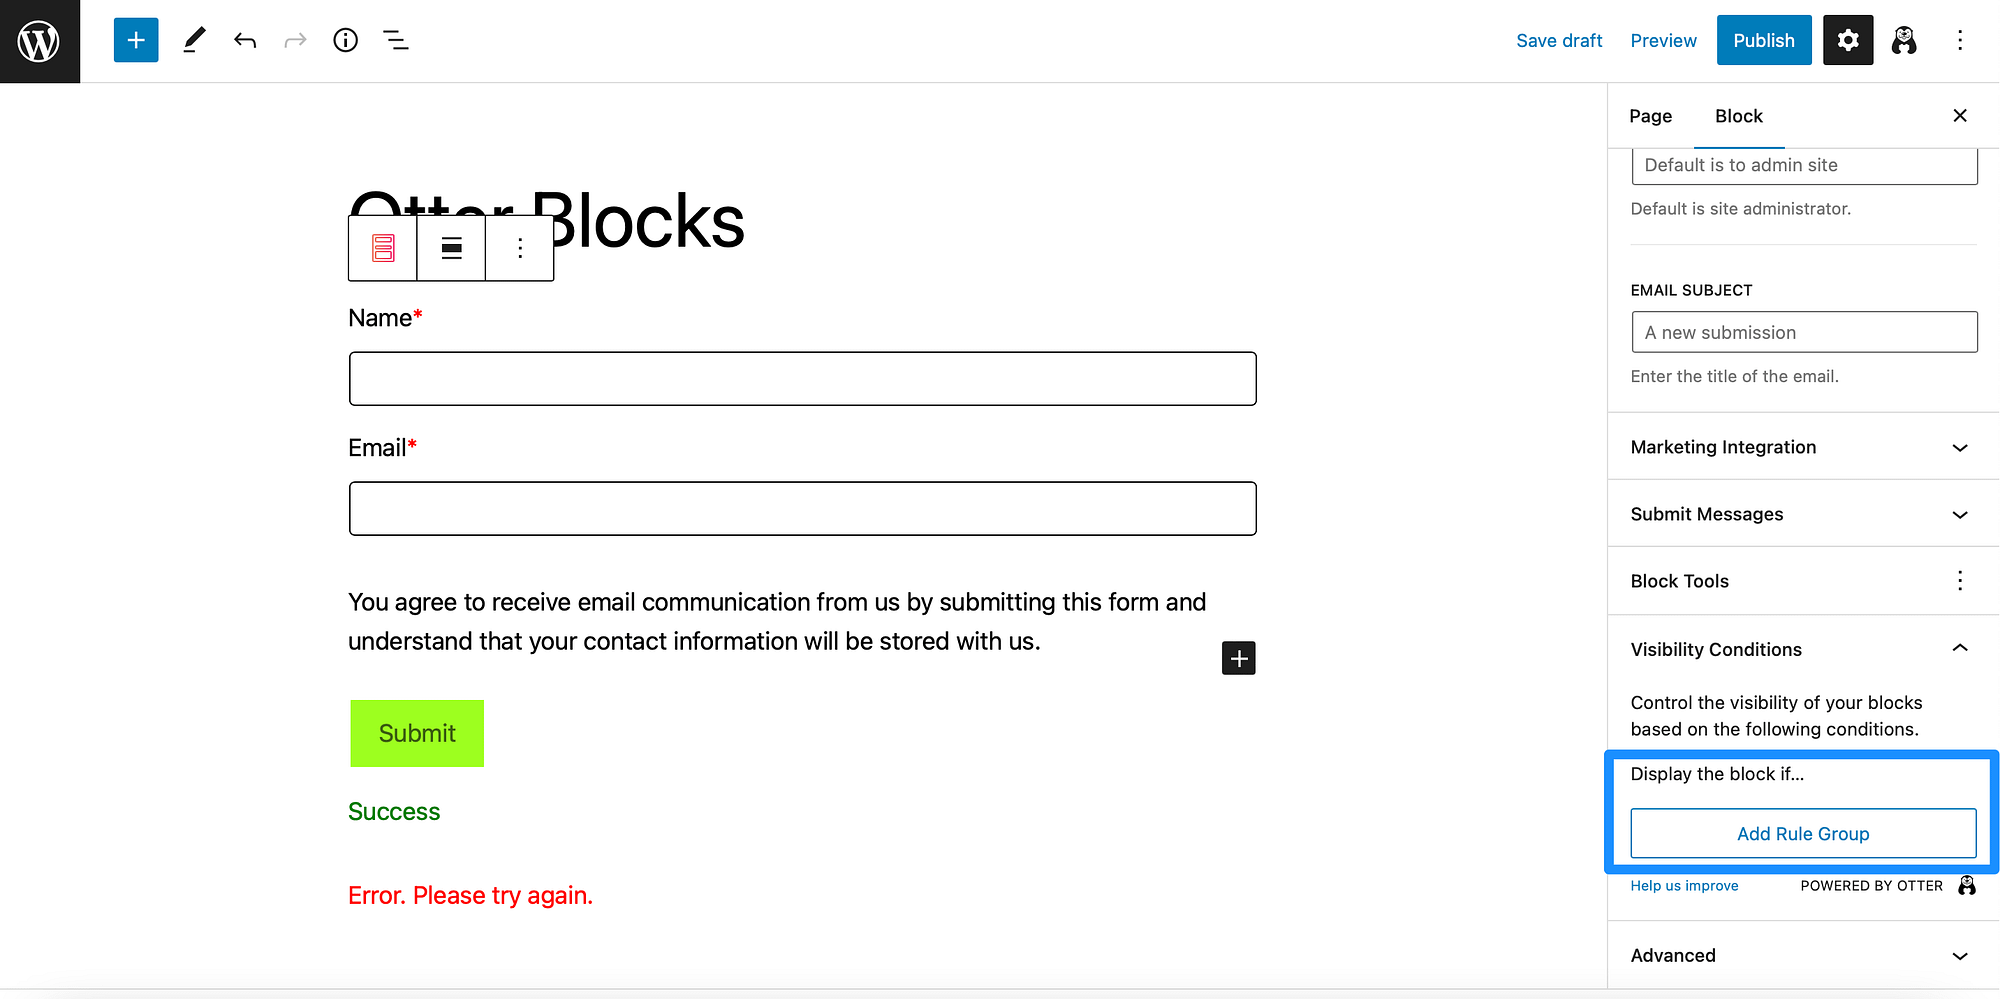
then, open visibility conditions tab below. click here add rule set,
Next, expand set of rules setting by clicking on the arrow. This is where you’ll apply your display terms. Use the drop-down menu to select SituationAs if logged in user,
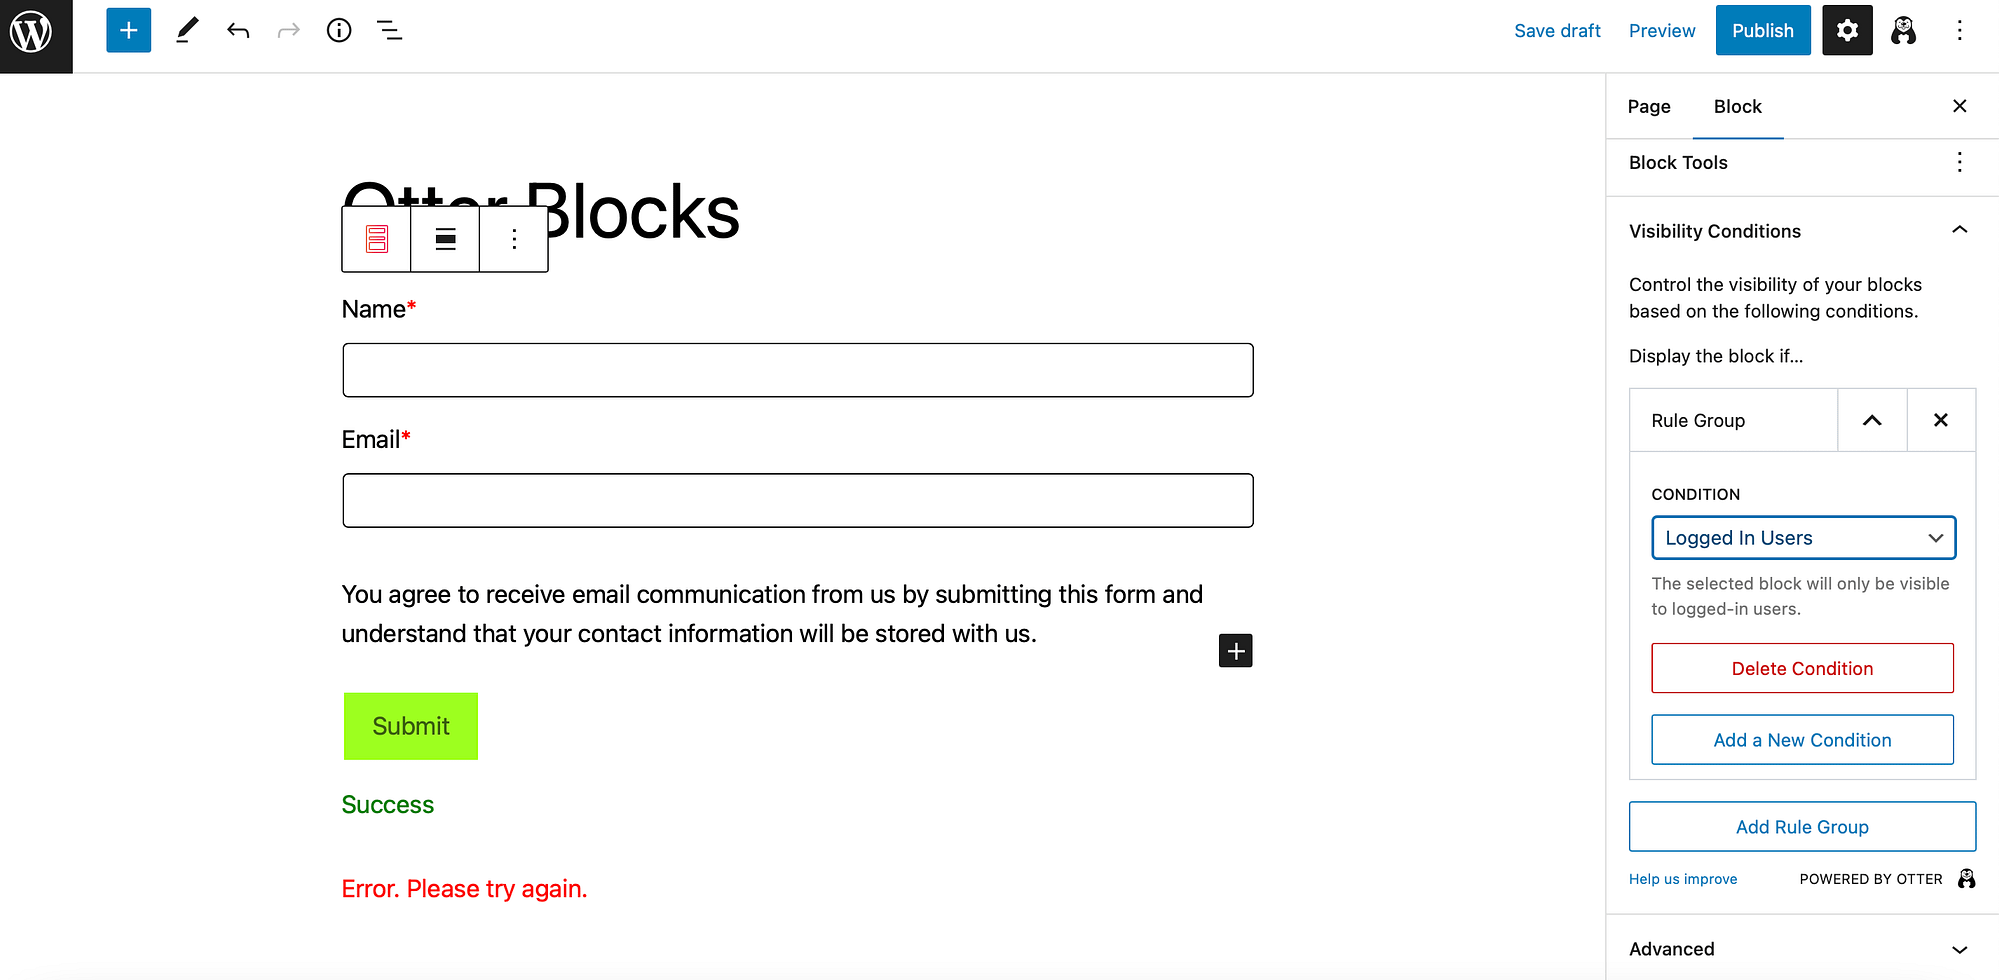
Now, your block will only be visible to logged in visitors. you can also click on add a new condition If you want to apply more conditions to your block.
Price determination: The free version of Otter Blocks includes the visibility conditions feature. However, if you want to get all the benefits of this tool, you can upgrade to a paid plan starting at $34.50 per year.
3. Product Addon and Fields for Woo Commerce (PPOM)
Using Product Addon and Fields for Woo Commerce (PPOM) is one of the easiest ways to create WordPress personalized content on your e-commerce site.
It’s kind of turning the concept of personalized content around visitors Option to personalize the products your store sells.
For example, visitors can add custom engraving, choose unique dimensions, choose their own materials, and more.
One of the most useful PPOM settings is the ability to configure custom pricing options. This way, customers can see the exact price they are required to pay as per the add-on or additional services they have chosen. We’ll show you how to set it up in the next section.
Personalize Your Pricing Options with PPOM
You need to install and activate PPOM in WordPress. then go to WooCommerce , PPOM Fields,
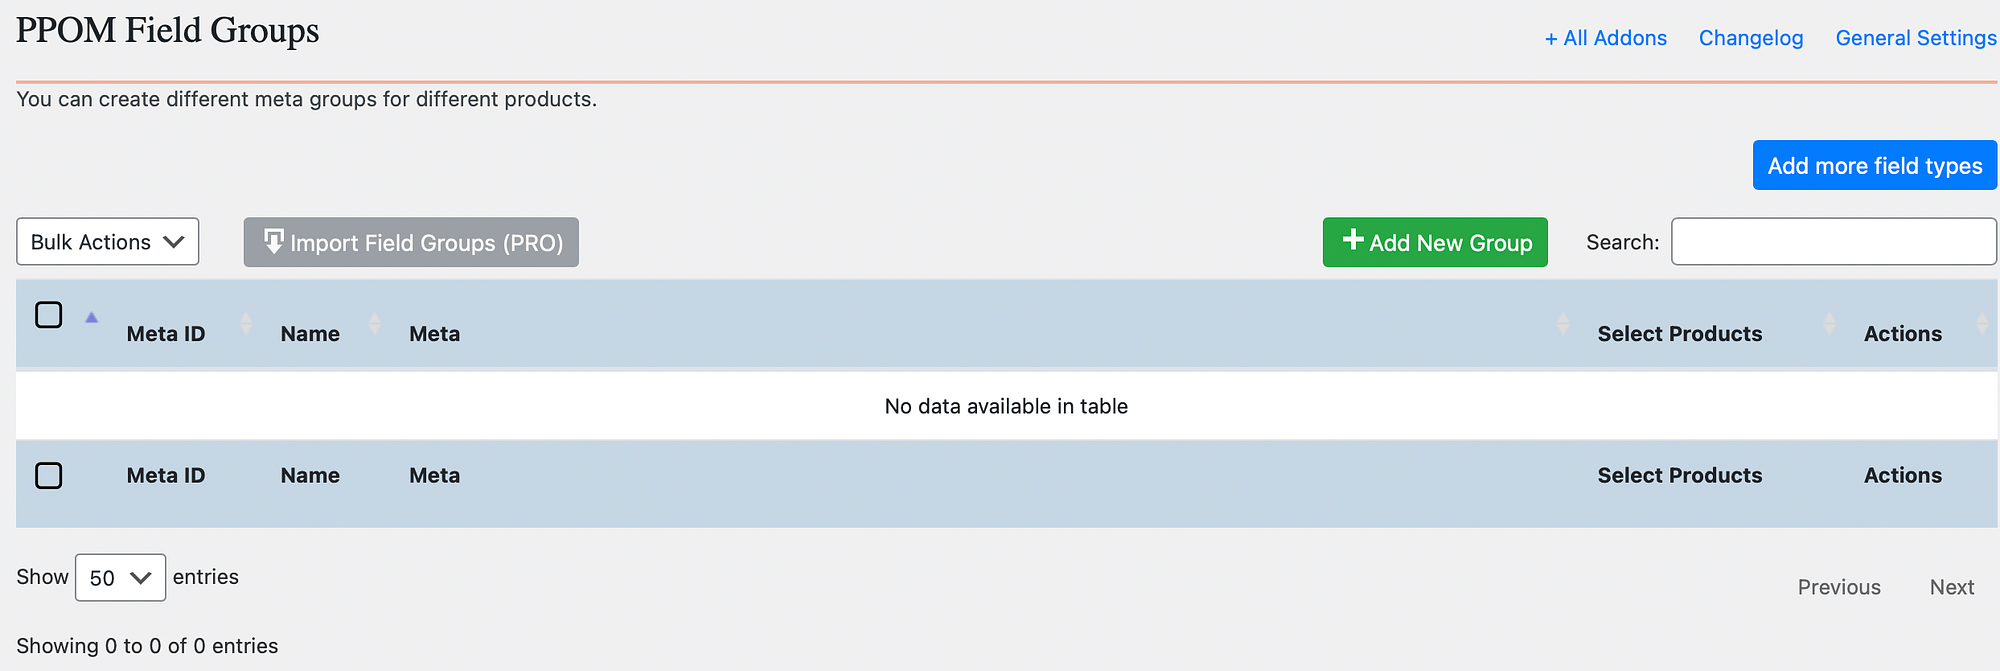
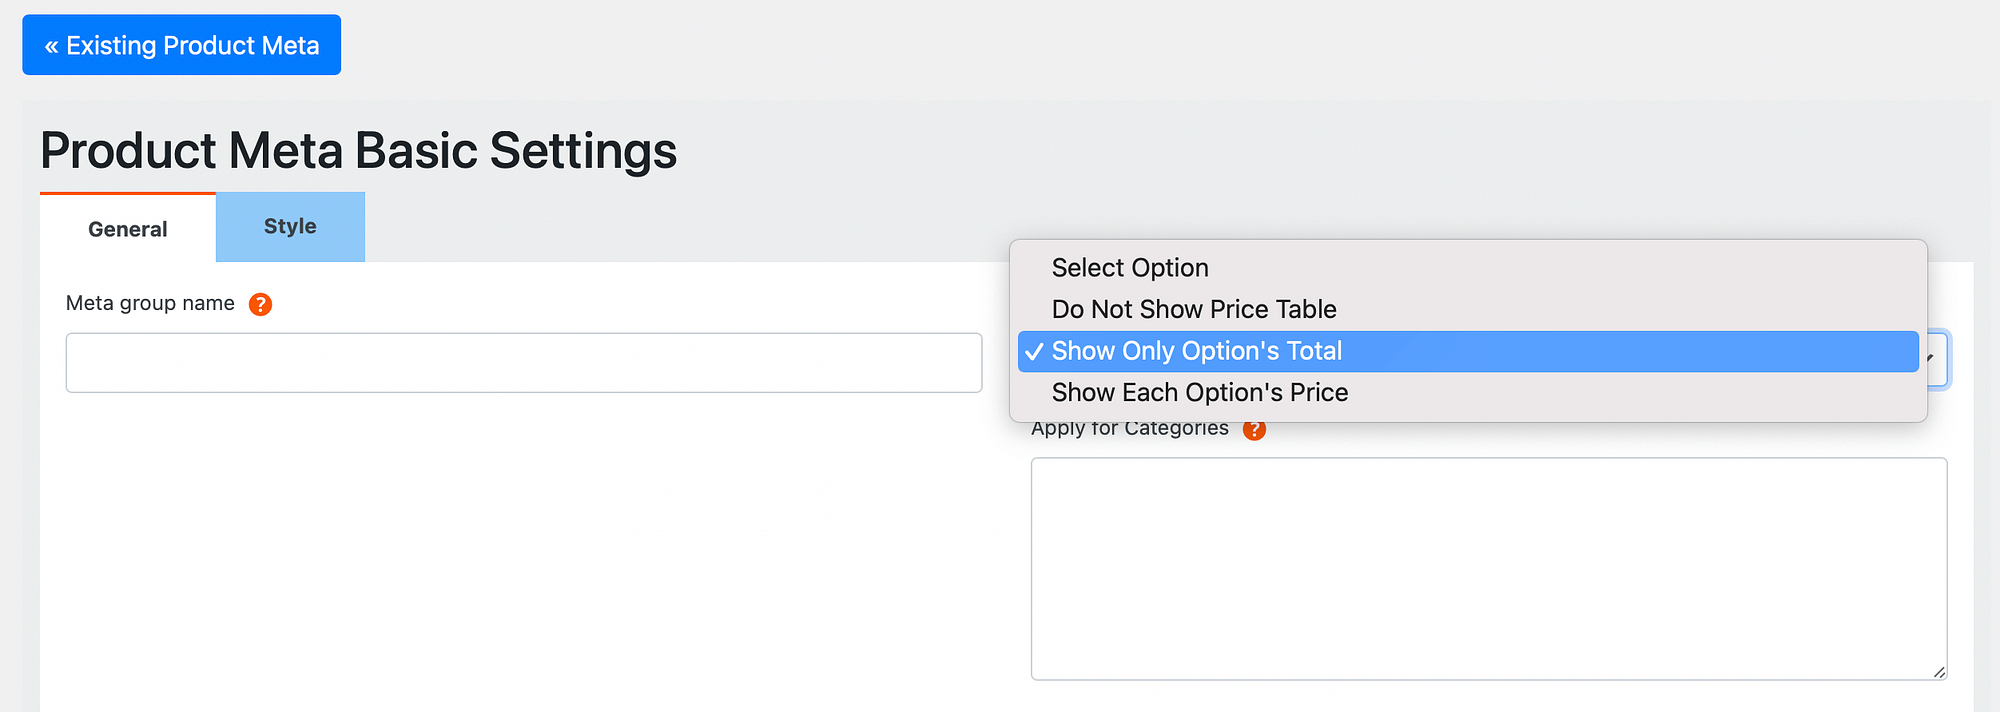
Now click on add new group, In Common Settings, choose a product meta group name such as “Hoodies”. Then, select your pricing options under Control price display on product page,
Click Next Add field and choose text input,
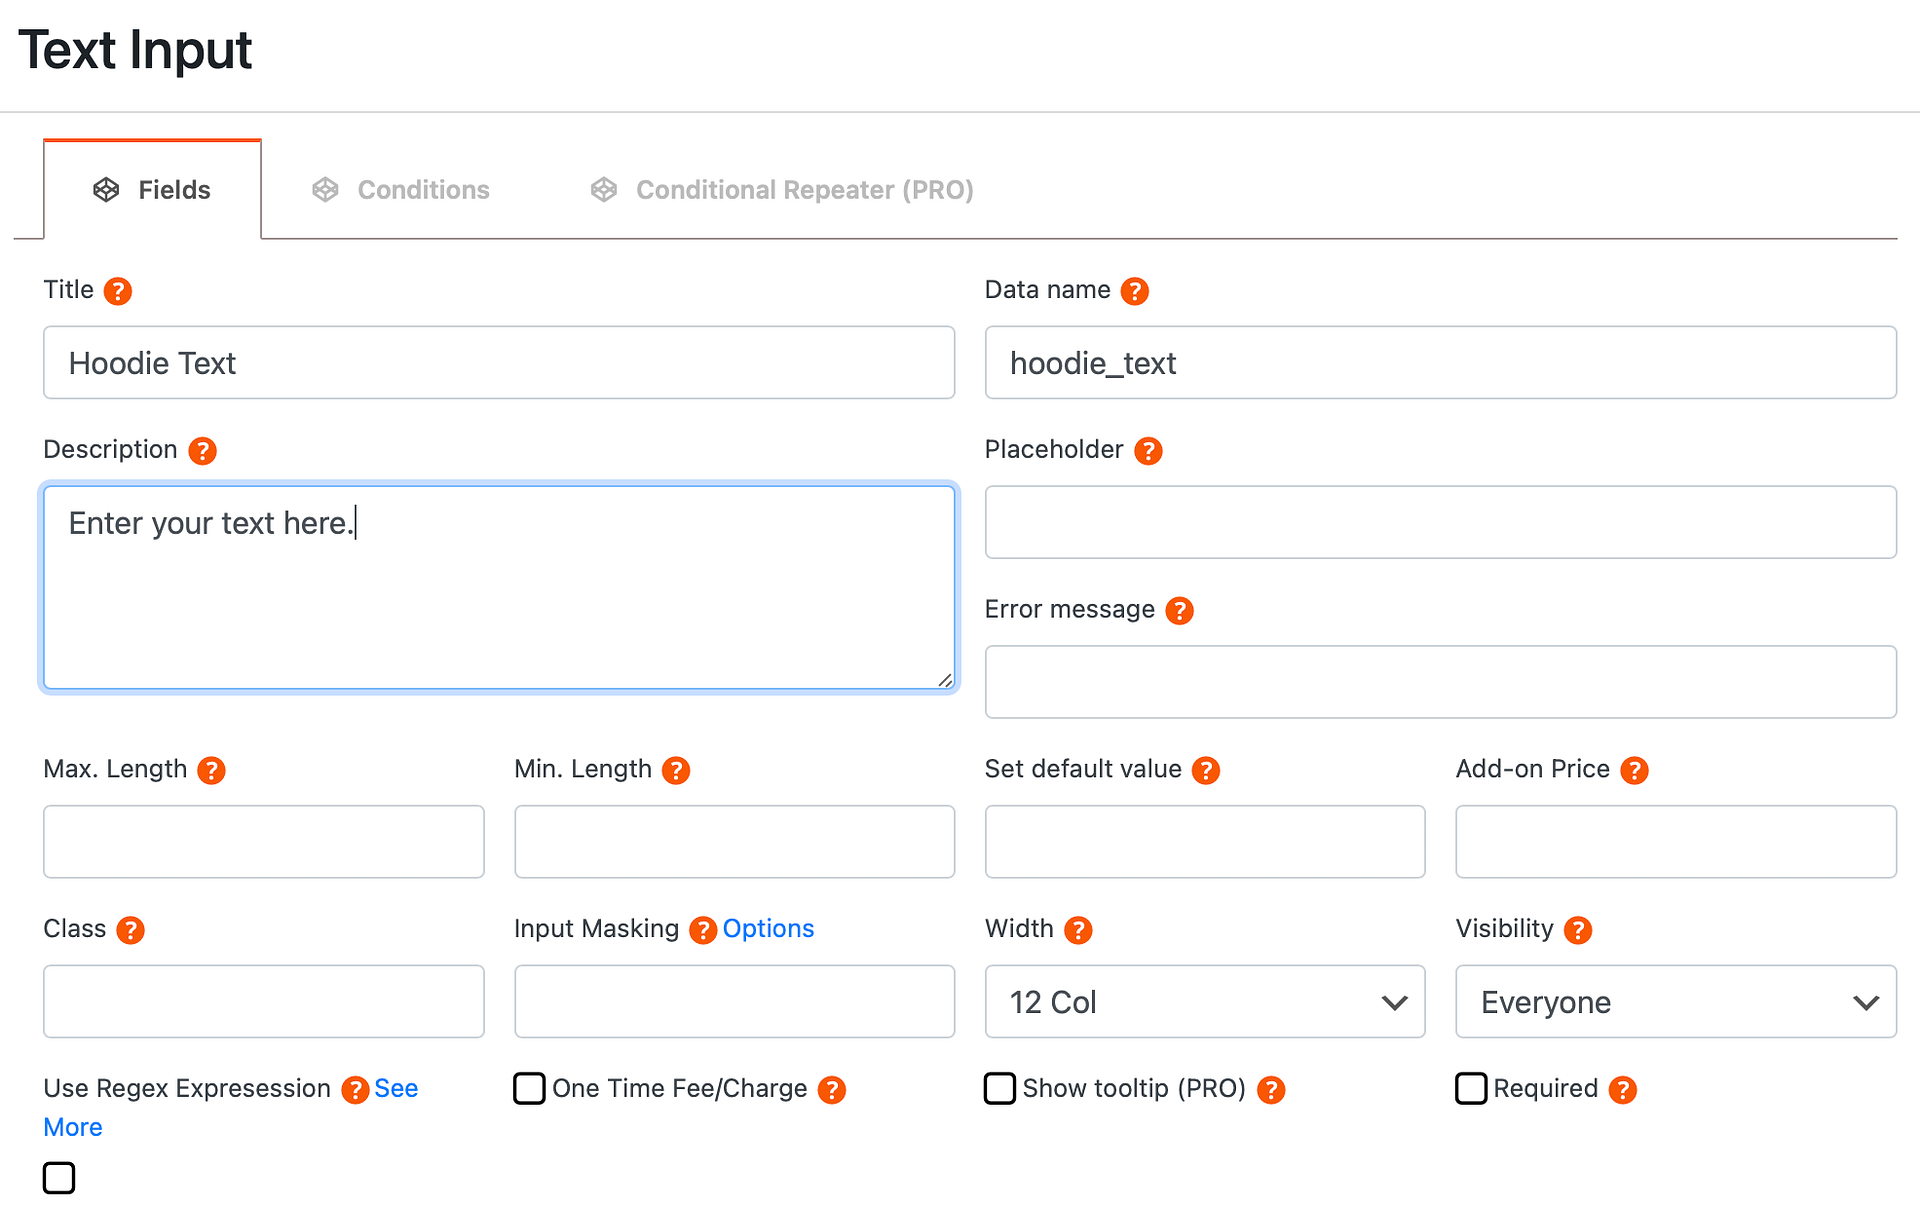
Give the field a name and add a description. This will be visible to the customer on your product page.
Now you are going to add a second field so you have to go again Add field button on the bottom-left side of the screen. choose this time select input,

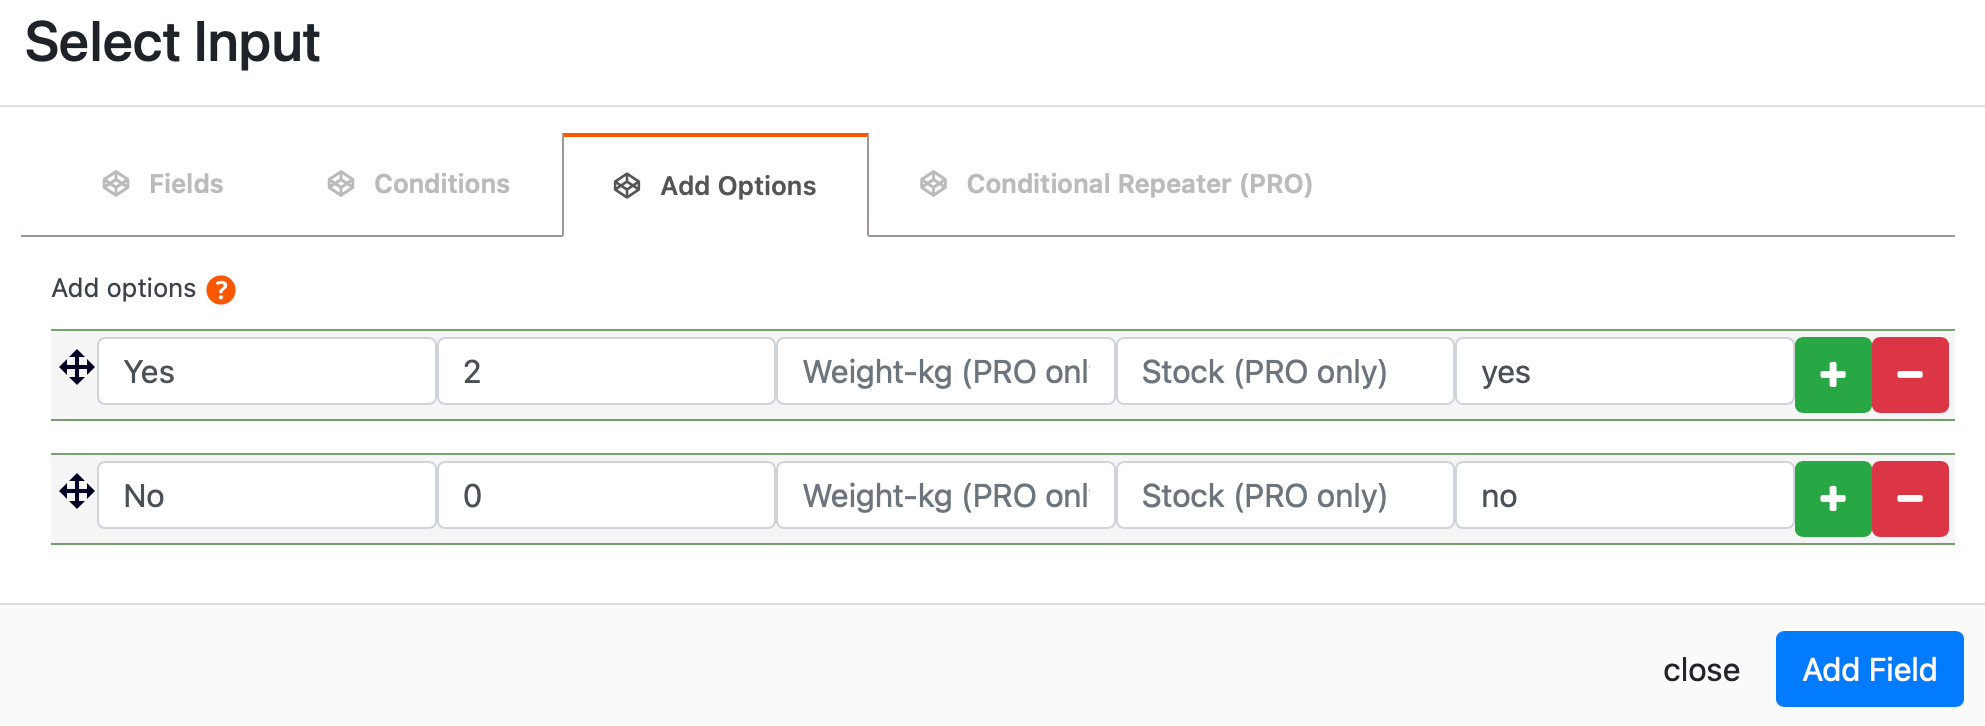
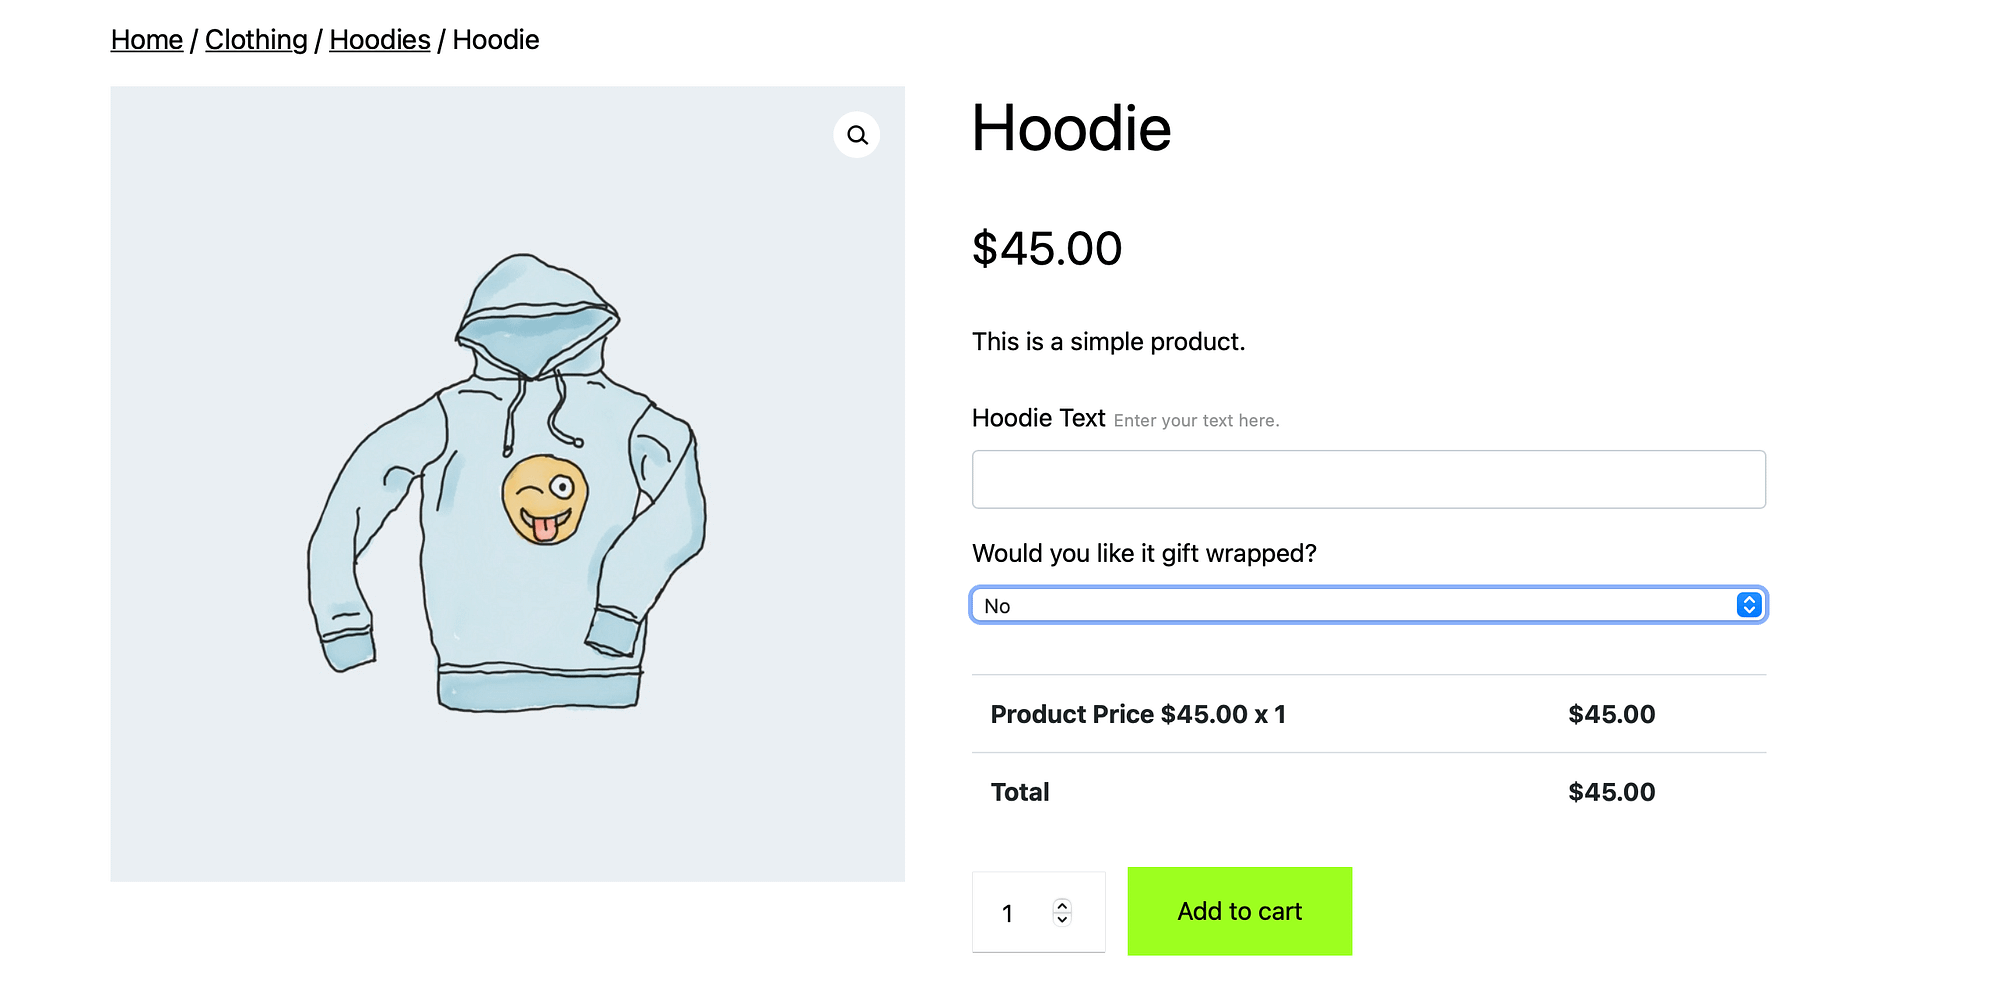
Here, you can provide various service options to the customer. We’re going to offer gift wrapping. Give your region a title and switch on add option Tab:
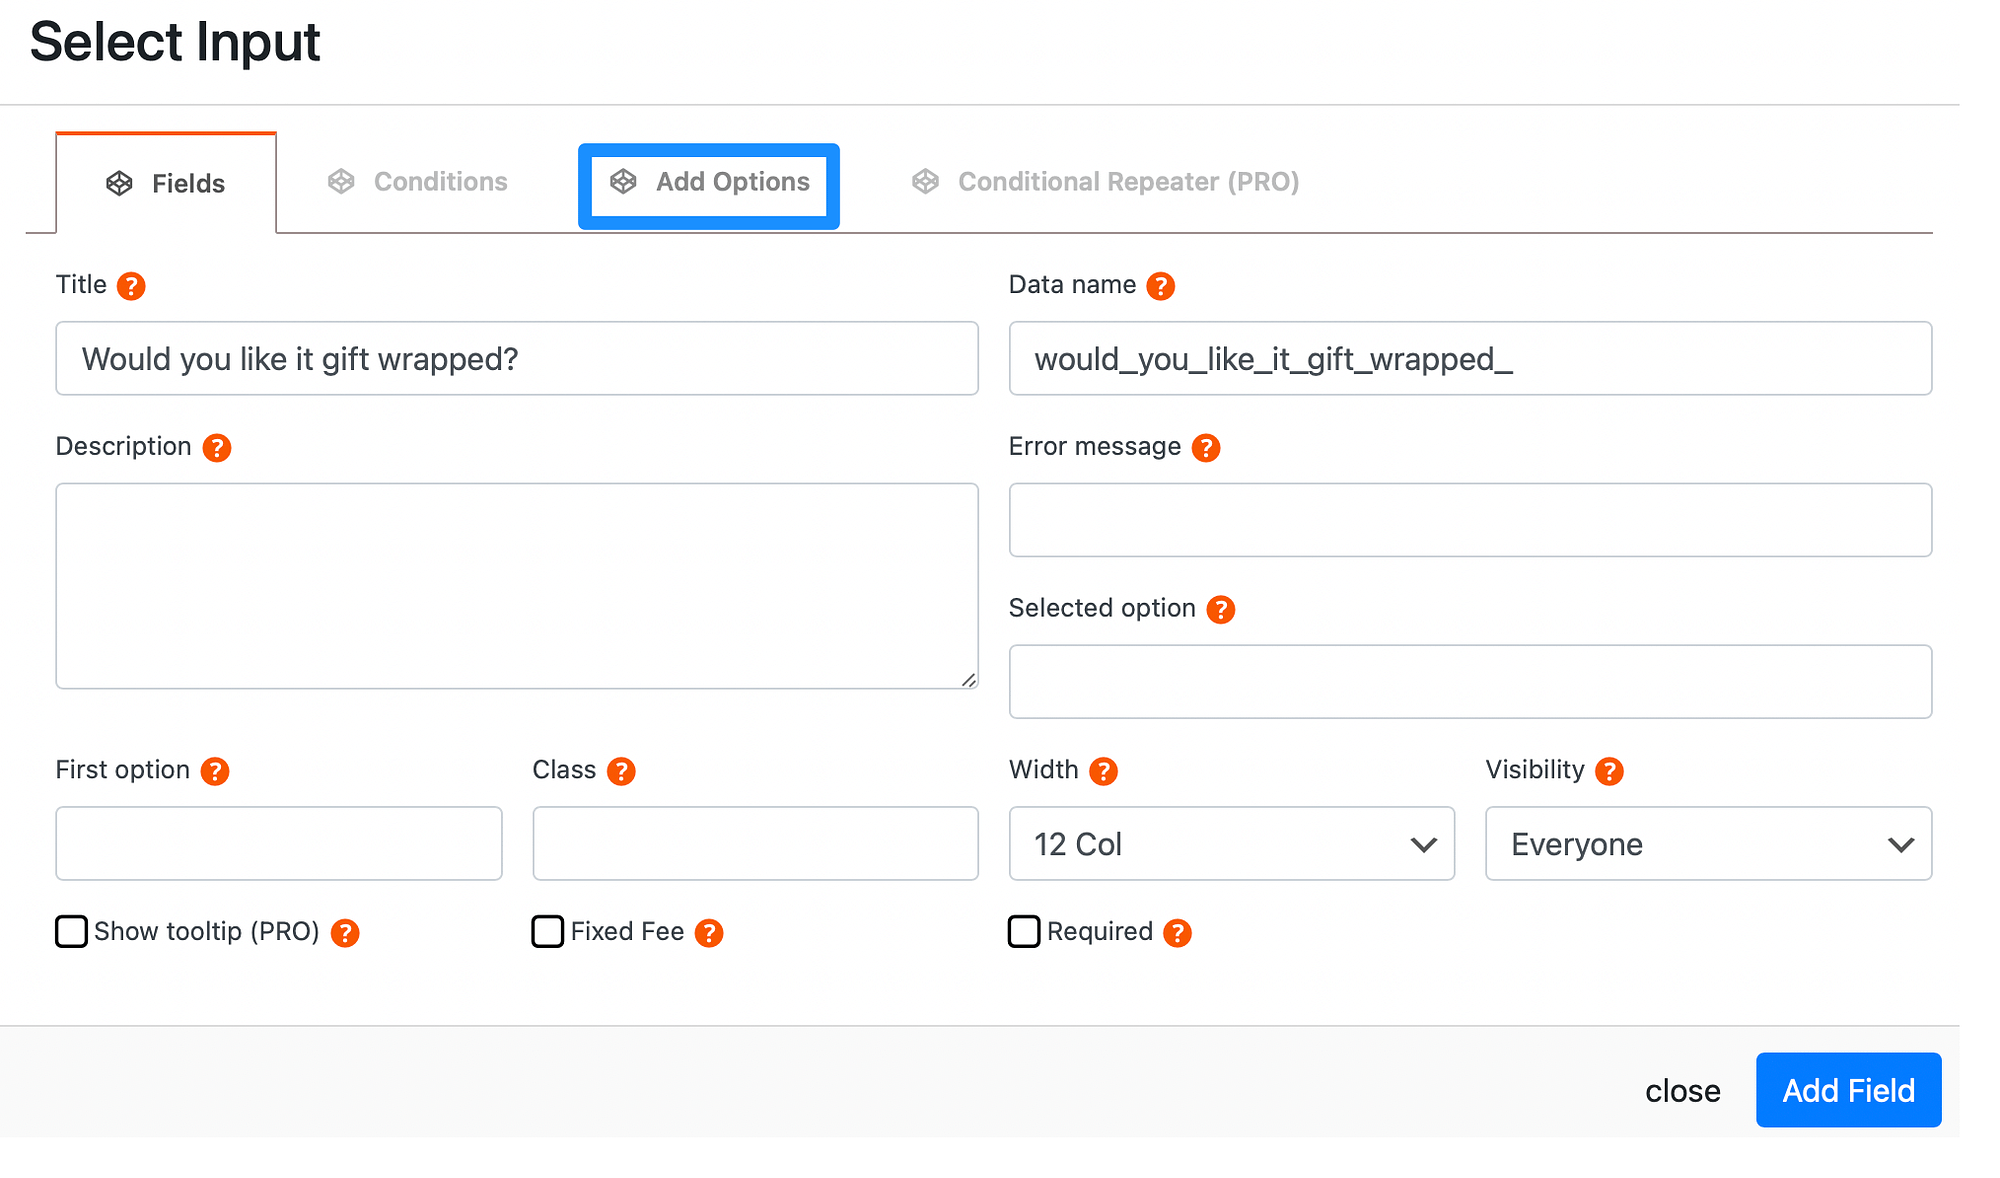
click on , to add more options and set the value for each. Then, once you’re happy with your options, hit Add field re:
Then, scroll down to the bottom of the page and click on save the fields,
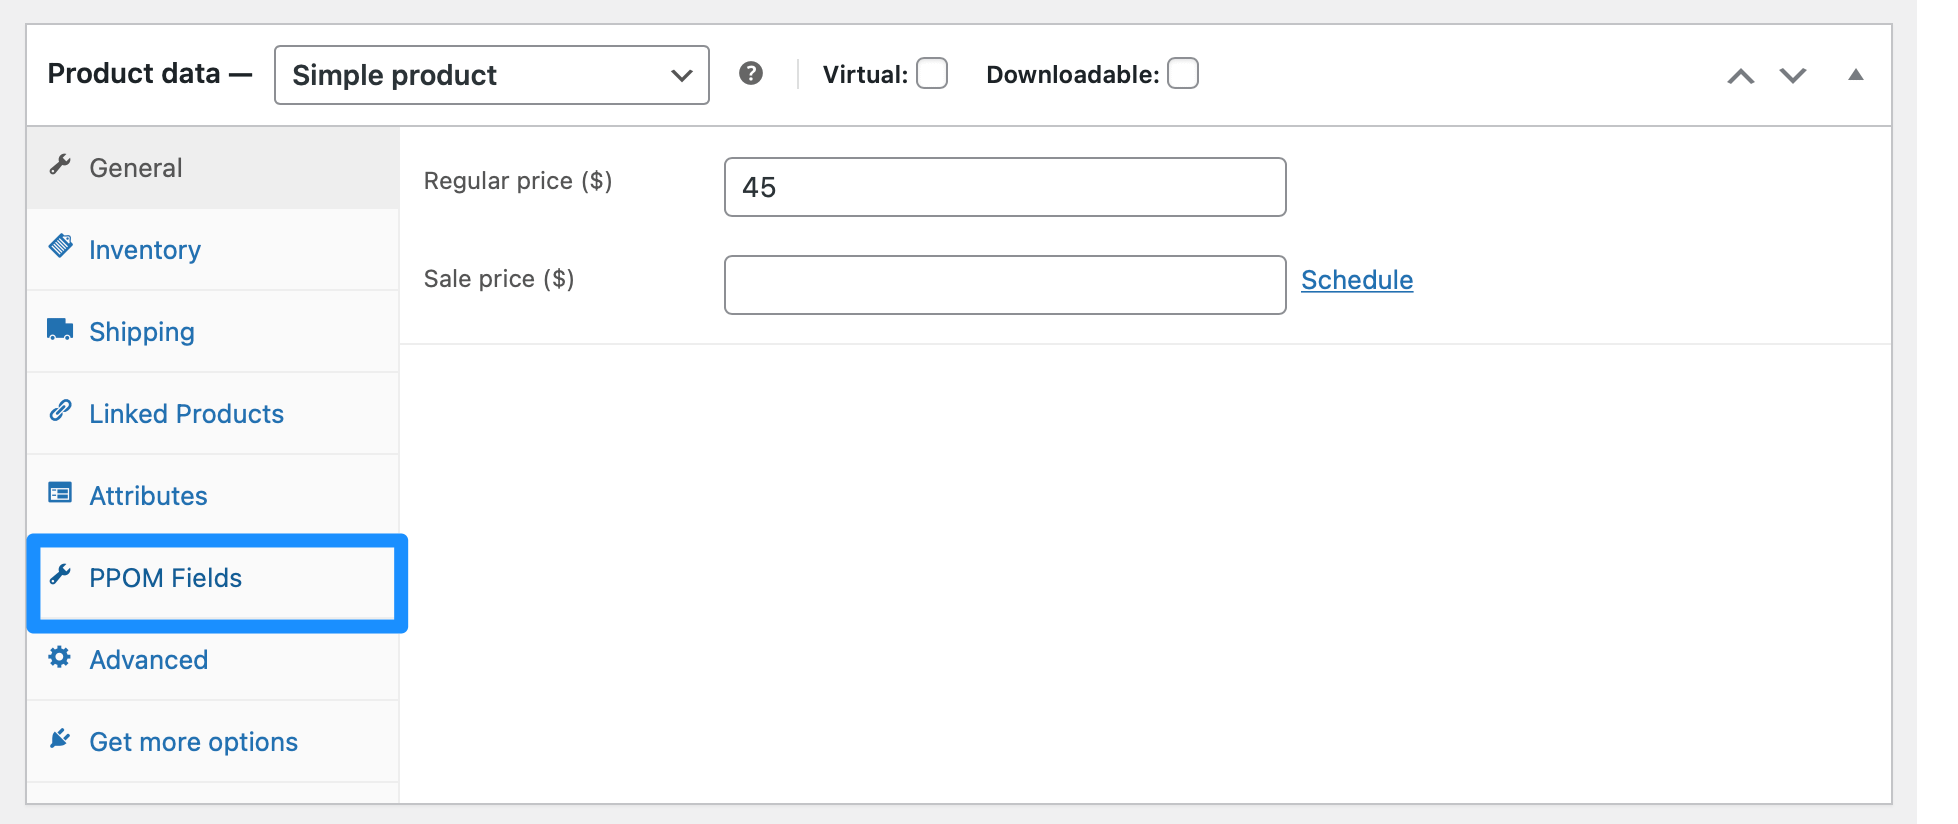
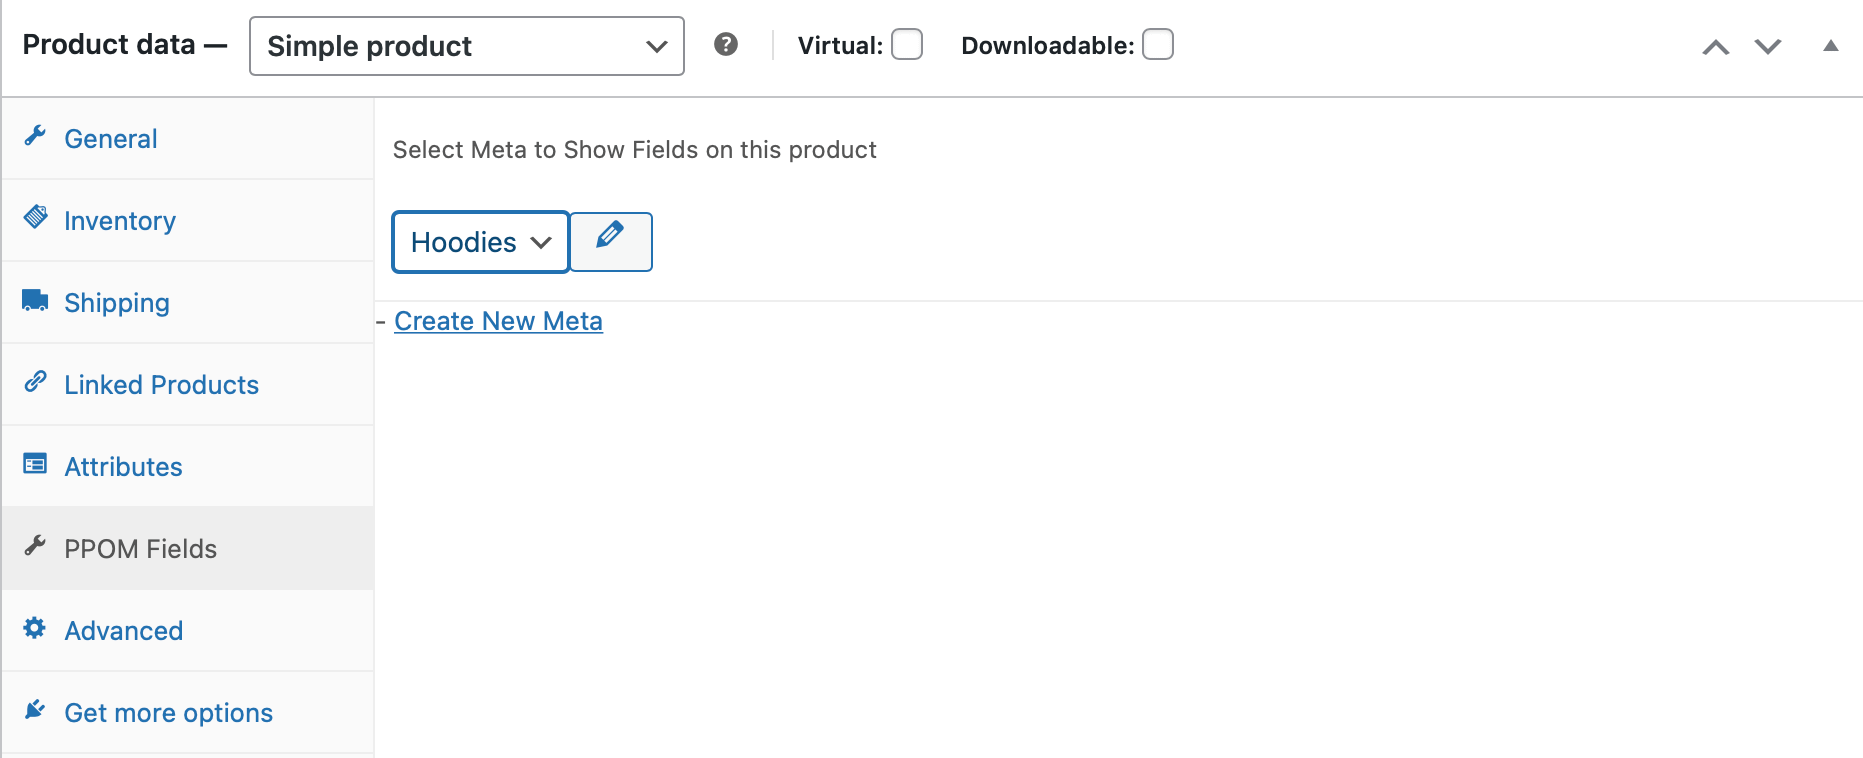
Next, you need to add your custom fields to your WooCommerce products. go towards products , all products and select an item. scroll down product data and choose PPOM Fields,
Use the drop-down menu to select the field you just created. Then, update your product:
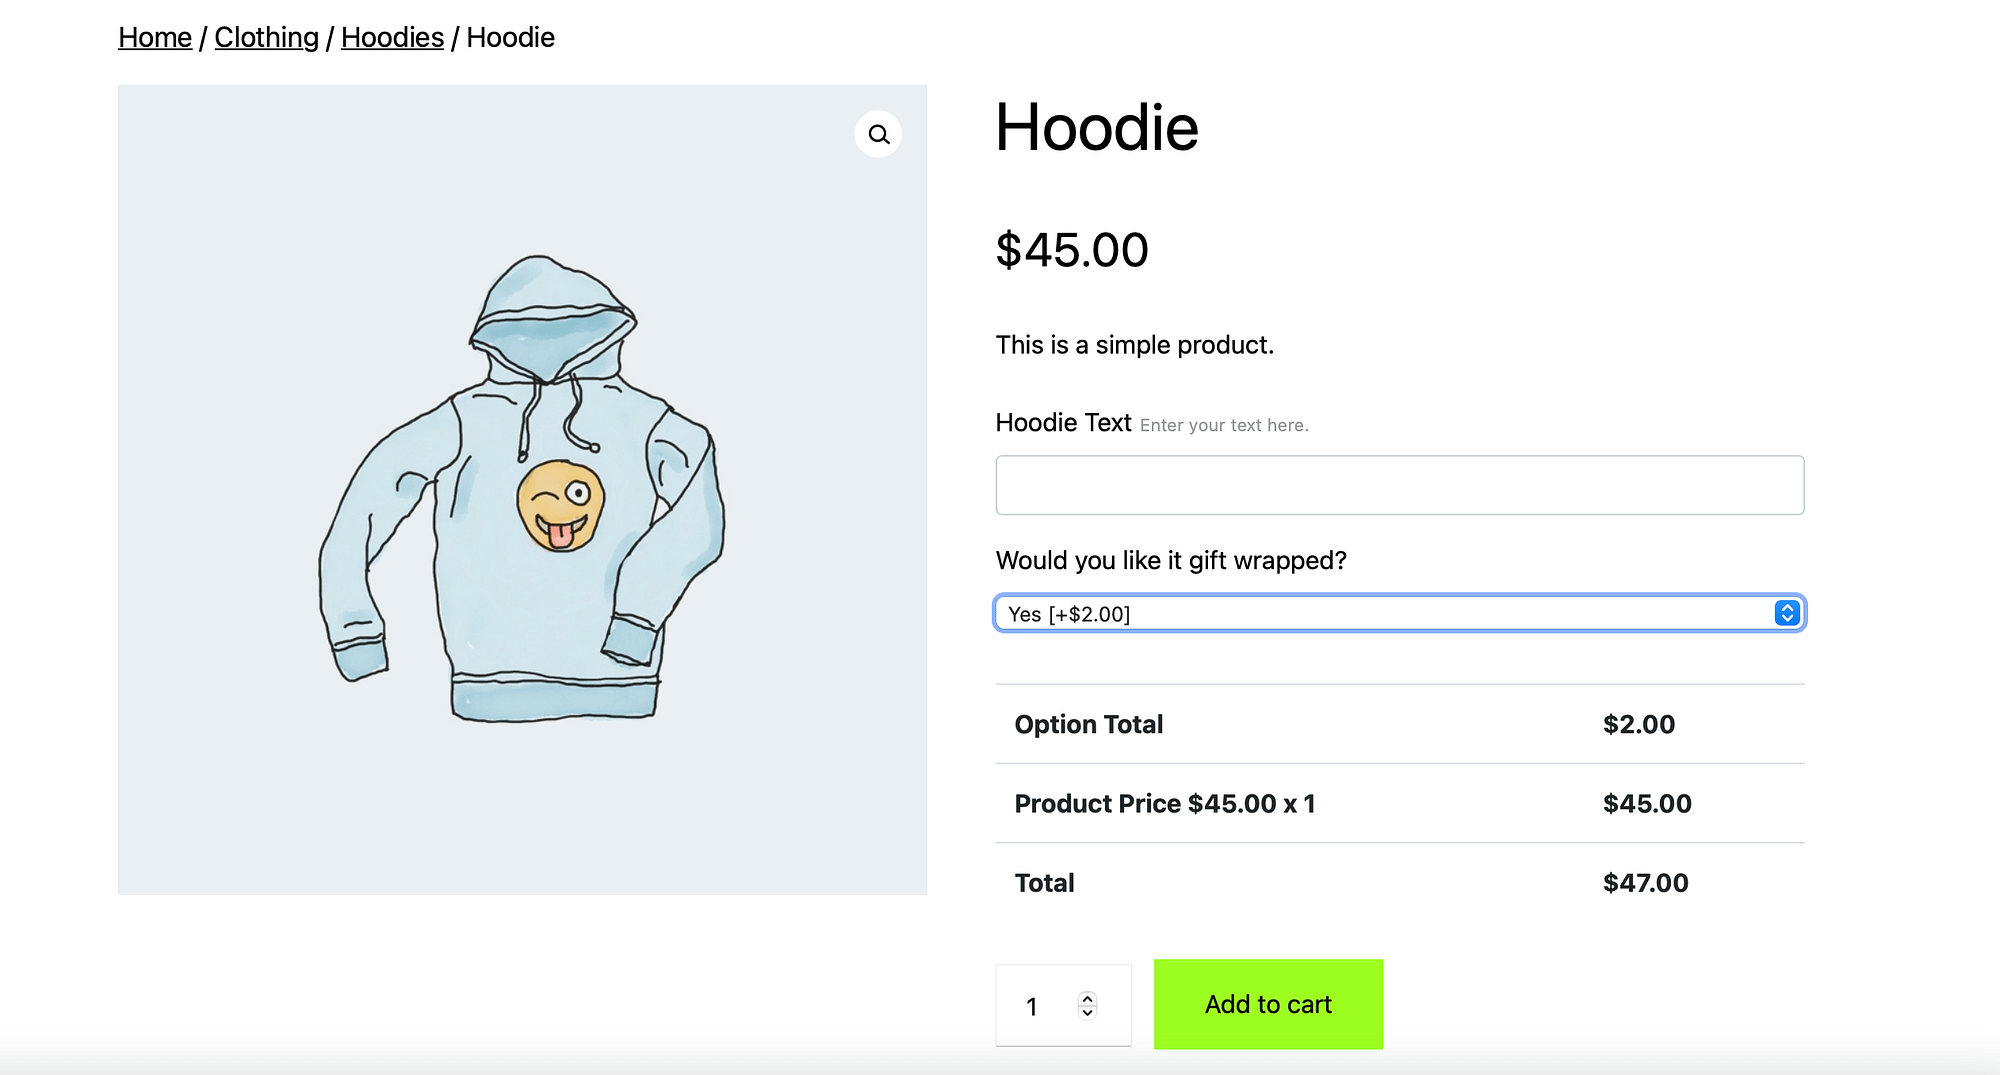
Now, click on view products To see what customers will see on your website. A customer who selects Gift Wrap will see the following price:
If a customer declines the gift wrap, they’ll see the following:
Price determination: PPOM is free, but if you want to use its advanced features, premium plans start at $99 per year.